Showing posts with label sewing. Show all posts

Monday, September 26, 2011

Tutorial: Bow & Whimsy Tank Top

You might remember few weeks ago I showed you my "A Bow and Whimsy Tank Top" in another post


Well, that same week I also shared a tutorial for the blouse over at a blog called Sunny Vanilla.


But just in case you missed it, today I thought I'd share the tutorial here at Crafty Critique.  You can follow me after the jump for the how-to.  Enjoy and let me know if you have any questions! :)


Sunday, September 4, 2011

A Bow & Whimsy Tank Top + A Surprise

Hello my lovely readers!  How are you today?  I'm so excited today because I get to show you something I sewed last week and have been so impatient to get to share with you!  Drum roll please...


Ta-da!  I call it "A Bow and Whimsy Tank Top," and I just adore the way it turned out. 


The oversized bow attached at an angle on one side of the tank top reminds me of Italian carnivals, tea parties, colorful balloons, woodland picnics, Sunday brunch and all things birthday, which is why I gave the sleeveless blouse its name.


Even better than how it turned out is how much it cost to make!  I thrifted the main fabric (2.5 yards for 50 cents) and made the bow out of a remnant from Jo-Ann's.  So, including the bias tape and interfacing in the shirt, it still cost me less than $2 to make.  No way, right?!


I finished this last Thursday and have been absolutely dying to show you!  So why have I waited so long?  Because I had an announcement to share with it!  So here it is: 
This Wednesday I'll be doing a guest tutorial for this top over at Sunny Vanilla.


And Jennifer from Sunny Vanilla will be sharing a tutorial for her "I Love You More Than..." Felt Book here at Crafty Critique. 

Never met Jennifer?  Well, allow her to introduce herself:

"Hello, my name is Jennifer @ Sunny Vanilla and I'm really excited about my blog swap with Madison at Crafty Critique.  Just a bit about me, I am a lover of crafts and fabric and basically taught myself how to sew through inspirational books at the library and watching more YouTube videos than I can count.  Outside of crafting and sewing, I am a mom to a 13-month old baby girl and a wife to a certain boy who stole my heart in high school.  I love dancing to the Mickey Mouse Clubhouse theme song, singing terribly in the car, eating the tops of muffins, and screaming the fight song to my alma mater.  I hope you enjoy my, "I love you more than..." felt book tutorial."

Thanks Jennifer!

And thanks to all of you for reading today!  Don't forget to stop back by here Wednesday for Jennifer's tutorial, and if you're interested stop by Sunny Vanilla on the same day to get the tutorial for the A Bow & Whimsy Tank Top! :)

Until then, happy crafting!

--CC

This post is linked up here.

Saturday, August 20, 2011

Tutorial: Sleeveless Bow Top

A lot of people are afraid to try and make clothing or draft their own patterns.  At least, I know I was when I first started sewing!  But a few tutorials of easy projects (like this one or this one) helped me find my bearings and I’m proud to say that I finally feel confident venturing out and making some of my own patterns.  And today I want to help you see that you can draft your own pattern and sew your own clothes, too!  Sooo….


Introducing the Sleeveless Bow Top Tutorial!  It's my first "big girl" tutorial, so bear with me (and email me if it doesn't make any sense!).

I modeled the Sleeveless Bow Top after this top I saw for sale online recently.   It’s a cute, comfortable top to finish out the summer with, and might even be great under a cardigan for the fall.  And the good news is it's made a lot like a pillowcase top so it’s just about one of the easiest garments you can sew!  I know you can do it, so follow me after the break to get started.


Tuesday, June 28, 2011

Quilting Widow(er) Appreciation Day

So, I'm not a quilter, but I do sew a lot (and blog a lot) and it does take me away from my beau for many hours at a time several days a week.  Not only that, I tend to get a little snappy with others when I'm trying to finish a project. So I thought this idea was a wonderful one when I first heard about it over on OCD.


The Plaid Scottie came up with the idea to reserve September 24 as "Quilting Widow(er) Appreciation Day."  What is that, you ask?  It's a special day to honor our significant others for all their patience and support by sewing something for them for a change.  (Read more about it in the original post.)The date is far off in the future, so there's no reason not to join in!  What will you be making?


Happy crafting!

--CC

Tuesday, June 7, 2011

Charity Sewing: Pillowfight for a Cause

Jump on over to Ladybird Ln. today to enter a pillow sewing contest while helping a really great cause.  Ladybird Ln. is hosting a contest called PillowFight.  You can enter any kind of pillow you've sewn to compete to win a prize, but with each entry you must donate a handmade pillowcase to patients in the hospital.  A pillowcase tutorial is provided, or you can use your own. 


I think this is a really great cause and I just wanted to pass it along to you all.  Feel free to re-post it on your blog to spread the word!  I'll probably be sewing up a few pillowcases and you should, too!  But, hurry!  The contest only lasts June 15-22 (although you can donate pillowcases anytime!).

Friday, June 3, 2011

Toddler Shirt with Lunar Bow

So, I lied a little bit when I said I hadn't really sewn anything except those shorts lately.  I have, in fact, sewn a disastrous toddler shirt.  Ever make so many mistakes sewing something that it makes you laugh?  That's what happened with this one.


It's the top I was trying to put buttonholes on and I made so many mistakes that I eventually started laughing until I cried.

Thursday, June 2, 2011

Sewing Slump and Bermuda Shorts

I knew I shouldn't have broken my one-post-a-day two-week-long streak, because now I've gone into a kind of sewing slump so posts aren't happening as much.  But based on what I've been seeing in the blogosphere, a lot of people are in a slump right now, too.  Maybe it's the heat?  (I know here in Florida it's already in the high 90s every day.  Oi.)

Anyway, remember how I shared that I was going to turn this into a bunch of bermuda shorts for my nieces and nephews?


 Well, I keep sitting down to sew them, but lose motivation before I've even got my pattern all unfolded.  So far my plaid fabrics have only manifested into one pair of shorts.  But I thought I'd go on and share them with you all since I know you miss me soooooo much.  (Aw, c'mon.  Play along!)


I used the same basic Simplicity pattern I always use, but I embellished with a few things that were not part of the pattern.  I added belt loops...


Buttons...


And those little loopy-buttony things at the bottom. (I'm not sure what they're really supposed to be called.)  I did make a little measuring faux pas with that part of the project.  You may have noticed up in the first picture how the one on the right side of the pants shows and the one on the left doesn't when the shorts are laying flat.  Whoopsie!  But I think they still turned out pretty cute, anyway.  :)


Well, I hope you're not in a sewing slump, but if you are stick around because I kicked myself in the butt today and made you a really quick, easy cute tutorial that I'll be sharing later this week.  Oh boy!  Until then, happy crafting!

--CC

Thursday, May 26, 2011

Tutorial: Knot No-Hem Capri Pants

So, sorry about the long break.  Things got a little crazier than I expected (financially, academically, and moving-ly).  But I finally had a little time to do some sewing and blogging today annnnd....I have what you've been waiting for (maybe)!  Remember this picture I used to taunt you in my last post?


Well....Introducing the Knot No-Hem Capri Pants...


Because there's knot no hem on them!  Get it?  Hahaha.  I crack myself up.  :)


 But, okay.  Seriously, let's talk about the pants.  I made three pairs of these pants for my boyfriend's niece and thought they were worth sharing.  They can be made into shorts or capri (cropped) pants.  I made mine capris because I figured the elastic would stretch to still fit in the waist as she grows and then as the length gets shorter maybe she can wear them as bermudas or even shorts (if they still fit in the waist by then). 


They're super easy, super cute and they don't take much fabric at all.  I made mine out of some scrap fabric and a remnant I bought at Jo-Ann's.

But you can make the project even easier than that.  If your youngster has some long pants they wore this spring that you know won't fit by fall, why not cut off the extra length and add the cute knot to the bottom to make them into a new summer item?


You could even make an adult version with some old jeans for yourself!


So without further ado, here's the Knot No-Hem Cropped Pants tutorial.  Join me after the jump to learn how to make your own pair.


Monday, May 2, 2011

Tutorial: Heat Therapy Pillow

Awhile back you might have read this post about heat therapy pillows I made.  If you didn't read before, basically they're small pillows filled with rice or flax seed that you can keep in the freezer and use as ice packs or microwave to use as heating pads.  They make wonderful, inexpensive and thoughtful gifts for a variety of occasions.  I think they're perfect for get well, Christmas, Mother's Day (hint!) and "just because" presents.

I've received lots of positive feedback on mine, so guess what?  Today I'm going to teach you how to make one for yourself!  My heat therapy pillows feature removable pillow shams for easy cleaning.  Join me after the break for the tutorial by clicking "read more."


Sunday, March 6, 2011

Old Family Photos

For my grandpa's birthday in February, my mom bought him a device that converts his old slides into digital photos.  My mom was working on getting all the slides converted for him today and in the process she emailed me a few of them from when she was a kid.

There were a bunch of pictures from a family vacation they took to Florida in the 1960s.  The vacation was to the same city in Florida where I live now.  The city has really changed, but the ocean looks just the same.


Look how close that tree line is to the ocean, and look how few buildings there are!  Now the coast line is dominated with big hotels and resorts.  But this sure hasn't changed:


The ocean is still as big, blue and awe-inspiring today as it was back in the '60s.

Of course, some things have changed.  This is an actual cloth diaper with safety pins.  I didn't realize what a recent development disposable diapers were!


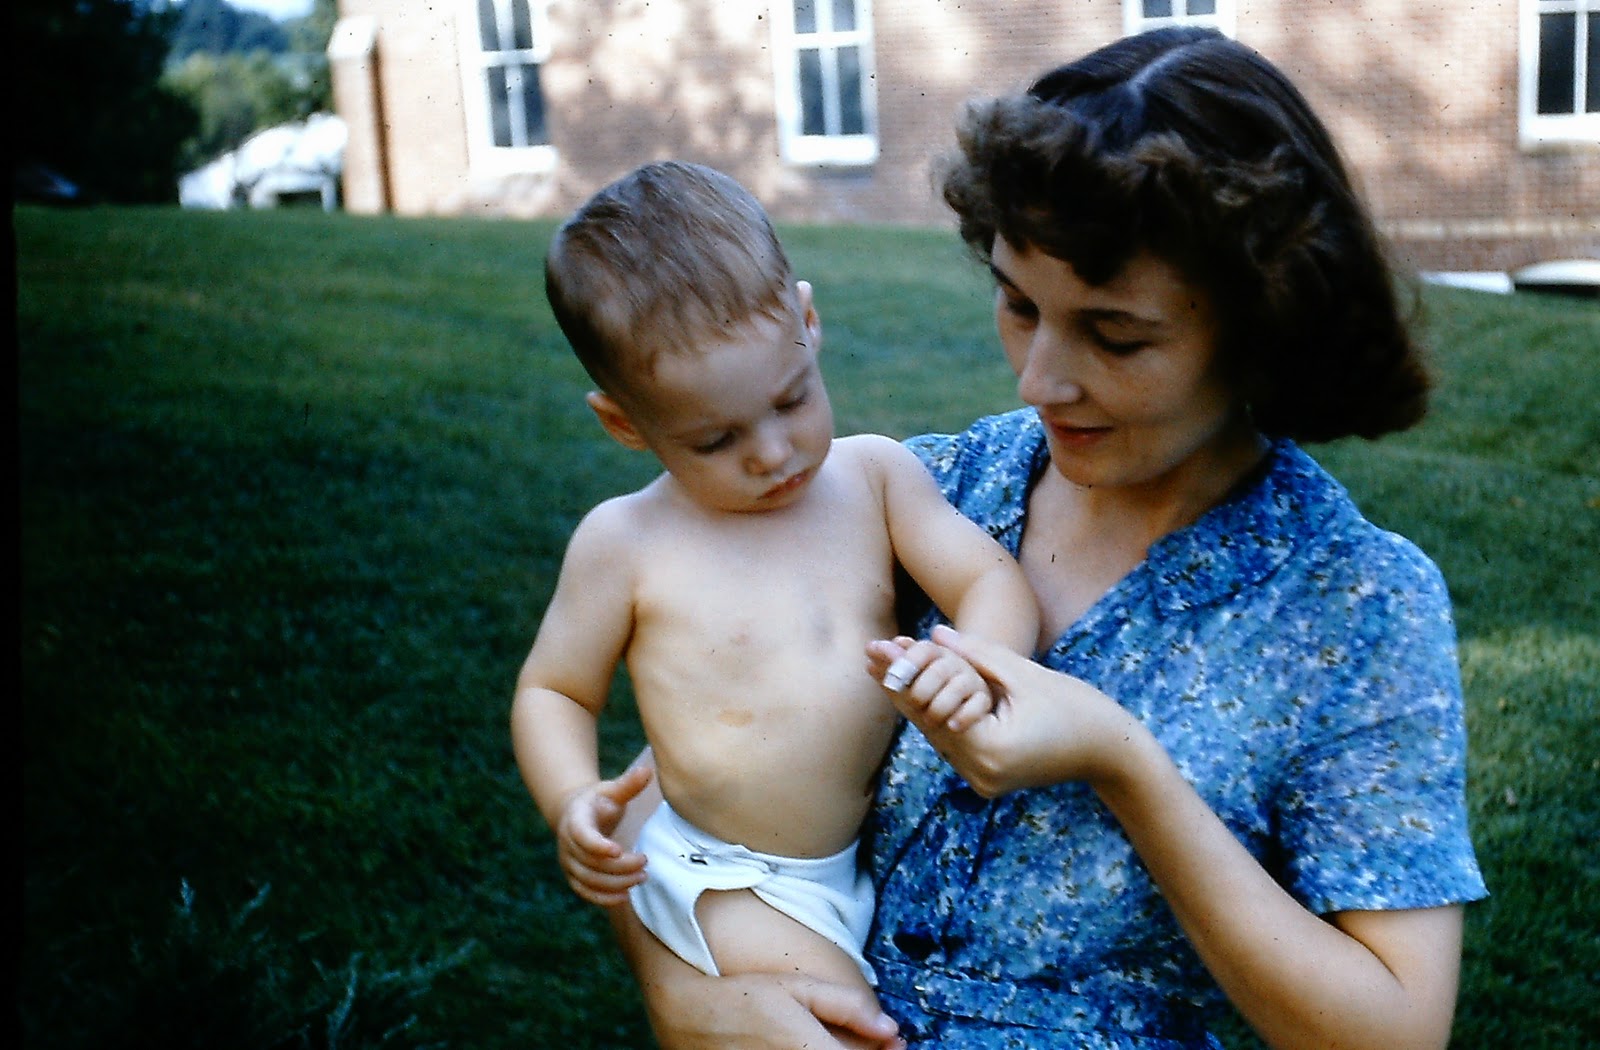
I spent a lot of time looking over the photos my mom sent me, especially the ones of my grandmother.  My grandmother died when I was very young, so I never got to know her that well.  But I've always felt very fond of her, despite only knowing her in the advanced stages of her Alzheimer's disease.  My mother and grandpa talk about her so lovingly, and I get told often that I remind people of her.

I really liked this picture of her because it looks almost identical to one my mom has of her with my brother when he was a baby.  It would make a statement to have them framed side by side.


And I absolutely adore this photo of my grandma and my great aunt.


They're so deep in conversation they didn't even notice the camera.  It really makes me wonder what they're saying.  And look at those dresses!  Very Anthropologie-esque.  Can we say inspiration?  I think I feel a sewing project coming on...

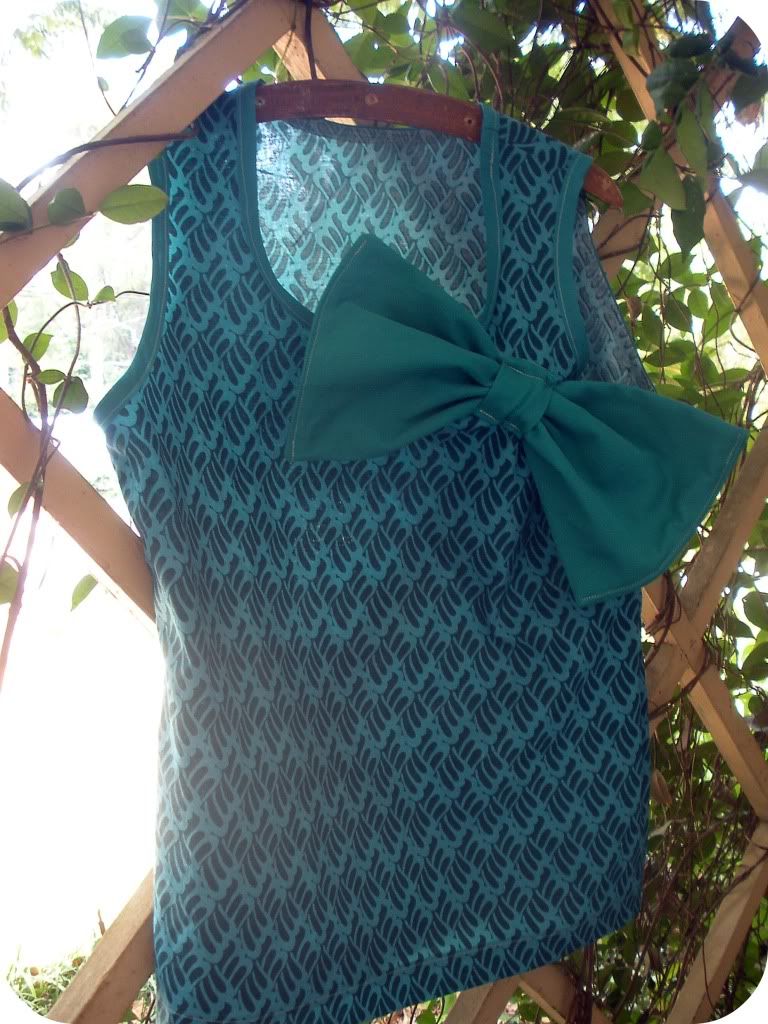
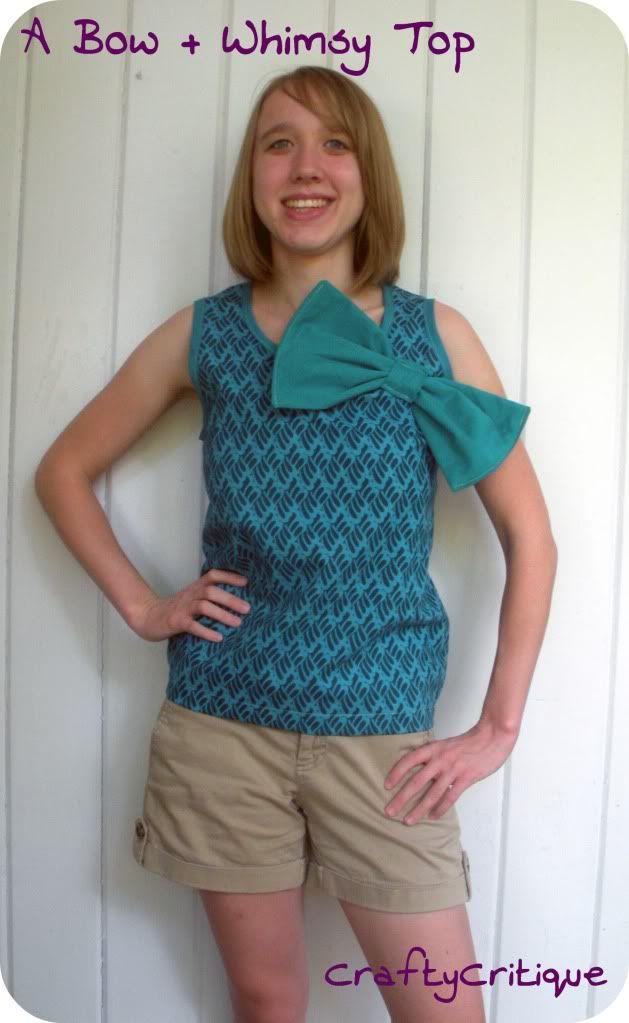
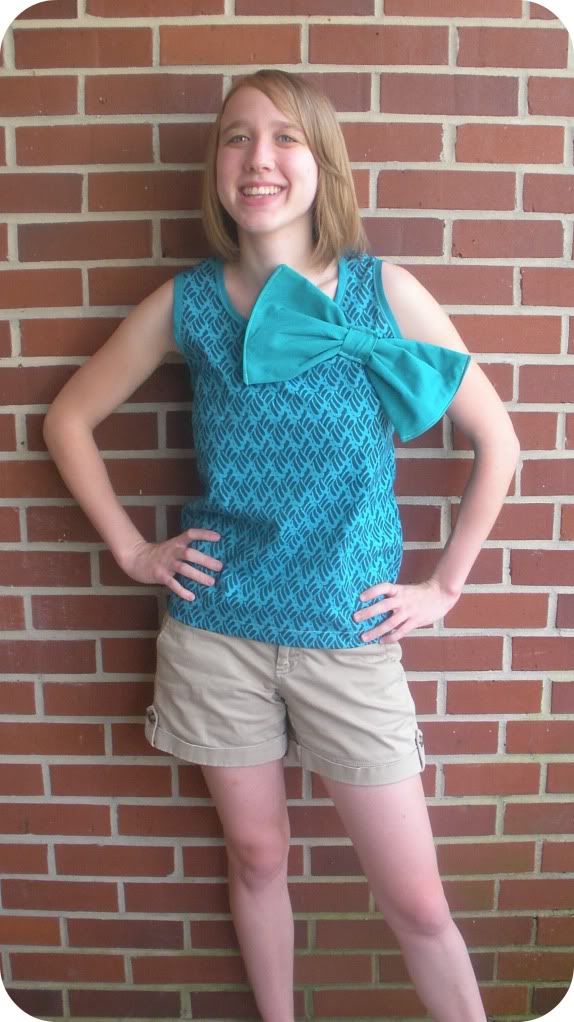
Mixed in with all these family photos were a lot of pictures of outfits my grandmother had sewn for my mom.  Like this one:


Or this one:


I just love the funny hat on that one.

Seeing the things my grandmother made with her hands made me feel connected to her...and to my own mother.  My mother sewed for me, my grandmother sewed for her and it's a sure bet that you can keep going on down the line like that.  And it made me realize...sewing ties all the women in my family together.

But, before you call me a sexist, it's not the act itself that matters.  For me, sewing is like using your hands to craft a tangible piece of love for someone else.  I don't have my own family yet, but my favorite things to sew are for other people.  It gives me great joy and pleasure to take care of other people with the things that I make.  I am so excited when I'm sewing something for my niece because I know it will make her feel special and it allows me to provide for her, in a way.

Sewing something for someone else is a way to say "I love you"...

I'd been thinking about doing a sewing event for charity since I saw a post on MADE recently.  This realization about what sewing means to me makes me want to do it even more.  Any takers?

And, before I go, my apologies for the lengthy post and the nostalgia.  But maybe it means something to someone else out there, too?  We'll see. :)

P.S. I'm thinking about getting some socks like these...


Just kidding!  See you next time. :)

Tutorial Review: Charlotte dress part 5: the invisible zipper

Remember a few days ago when I almost jumped in front of a bus because I couldn't figure out that invisible zipper tutorial?  Well, today I decided to try a different invisible zipper tutorial to see if it went any better.  The tutorial I decided to use was The Charlotte Dress Part 5: The Invisible Zipper from Craftiness is Not Optional.

Just to clarify, I did not actually make the Charlotte dress.  The only part of this tutorial I'm reviewing is how to insert the invisible zipper, which I inserted into another party skirt because I just loved how the first one turned out.


Okay.  Ready?  Let's check out the zipper.  Here's how my invisible zipper turned out with the Charlotte Dress tutorial:


To compare, here's how my invisible zipper turned out with the tutorial from Clever Nesting:


Much better this time than last, huh?  I was proud.  So let's get on with the review.


Accuracy: 9
Clarity of Directions: 8.5
Helpfulness of Pictures: 8.5
Difficulty:
7
Time: 30 min.
Overall Rating: 8.5
Recommended 

Details:

This tutorial was so, so much easier to understand than the one I tried last week.  To be fair, I had never tried to sew an invisible zipper before last week, so I can't say for sure that the tutorial was as terrible as I felt like it was or if it was just because I'd never sewn one before and had no idea where to even start.  But, on my second try with the Charlotte Dress tutorial, I didn't even have to rip out any seams!  And the zipper is totally invisible.  Hurrah!
The instructions were pretty clear and the pictures illustrated the verbal steps quite well.  The only hairy part (the reason why I took off some points on the clarity of directions and on the helpfulness of pictures) was sewing down the second side of the zipper.  The verbal directions here were a little mucked up, and the picture was cut off at the bottom so that I couldn't see the whole zipper and figure out quite what I was supposed to be doing.  I really didn't want to rip out any seams this time, though, so I pinned the zipper in place and kept trying to zip it up until I got it pinned in the right place.  This actually took three tries, which means if I had have sewn it down before checking maybe I would have hated this tutorial as much as the last one.  Who knows?

So, my tips on invisible zippers, then?  Maybe it's not as much about the tutorial as I think it is.  The key, in my opinion, is trying to zip the zipper once you have the second side pinned before you actually sew it!  That way you can see right away if you have it placed right or not and avoid ripping it out four times and wanting to shoot yourself. :)

Soo...I guess that's all I've got for ya right now.  Happy sewing and see you next time! :)

Friday, March 4, 2011

Tutorial: St. Patrick's Day Shamrock Flag

Hello sewing world!  The other day when I made my St. Patrick's Day garland, I had leftover fabric and whipped up something for my door, because, let's face it, it's just too soon to put up the Easter egg wreath.

The wind was blowing a LOT the day I took this.  Sorry it's crooked!
And I thought you might like one, too.    So are you ready for another exciting new tutorial?!  Okay, let's get started. :)  Follow me after the break to learn how to make your own St. Patrick's Day Flag! :)


Thursday, March 3, 2011

Tutorial Review: St. Patrick's Day Garland from Kirstikoo

I had some free time this afternoon and decided to do some quick home decor crafts.  If you're like me, you're probably ready to get down those Valentine's Day decorations and get something up for March.  So I hit Google and found this really cute St. Patrick's Day Garland tutorial over at Kirstikoo.  This is what I came up with:

The tutorial made a pretty long strand of garland.
And I just love the way the cute little buttons look on the end.


So, surprise surprise, today we'll be taking a look at the St. Patrick's Day Garland tutorial from Kirstikoo.  I'm really whipping out these tutorial reviews this week, aren't I?  Anyway, here we go!


Accuracy: 10
Clarity of Directions: 10
Helpfulness of Pictures: 10
Difficulty:
1
Time: ~1 hour
Overall Rating: 10
Recommended 

Details:

So this review almost seems a little unfair after the last two reviews I wrote.  But, really, there weren't a whole lot of ways you could go wrong with this tutorial!  I mean, garlands are kind of self-explanatory.  And this one was super simple.

Like the tutorial said, the most time consuming part was cutting out all the felt clovers.  That's where I spent 90% of my time.  The rest was just sewing in a straight line and putting on the buttons!  Simple, simple, simple.  There were lots of good pictures and the directions were well-written if you're a "green" sewer and need to be walked through it.  (Ha-ha-ha...I'm so punny!)

 I do have one important note about the tutorial, though.  The tutorial provided a shamrock template for cutting out all your little clovers.  It was supposed to open in Google Reader, but when I opened it I got a "Server Failed" page.  No worries, though.  Just type "shamrock line drawing" into Google and click on images.  I found this one, saved it and resized it to my liking.  (As a sidenote, that website might be good for seasonal projects later.  Lots of line drawings of holiday things!)


Clearly, this tutorial gets my recommendation.  Simple, quick and a definite home sprucer-upper for March. :)  
Related Posts Plugin for WordPress, Blogger...