Tuesday, November 27, 2012

Christmas Craft List


For the past few years I've noticed that I no longer have a big Christmas Wish List.  When asked what I want for Christmas, I simply come up blank.  Now that I've graduated from college and am working, time is more precious and the holidays are more about slowing down and enjoying the beauty of the season around me--spending time with loved ones, enjoying all the pretty decorations, eating good food, and crafting, of course!  So instead of my Christmas Wish List, today I want to share with you my Christmas Craft List.  I've got a few projects in the making as we speak!  (Updates to come!)

1.   White Pinecone Wreath with Cardinals and Red Ornaments via Better Homes & Gardens


I found this beautiful project on Pinterest, and fell in love immediately.  Over the years I started collecting all my Christmas ornaments based on color (silver and bright red glittered ornaments), but somehow ended up buying all snowy bird and pinecone ornaments.  What can I say?  I have a thing for birds and pinecones.  Anyway, this wreath is right up my alley and I can't wait to hang it on my living room wall to go along with the rest of my Christmas decor.  I've already bought the supplies, and I'll be making the wreath with a few modifications.

2. Christmas Tree Photos via Lil Blue Boo


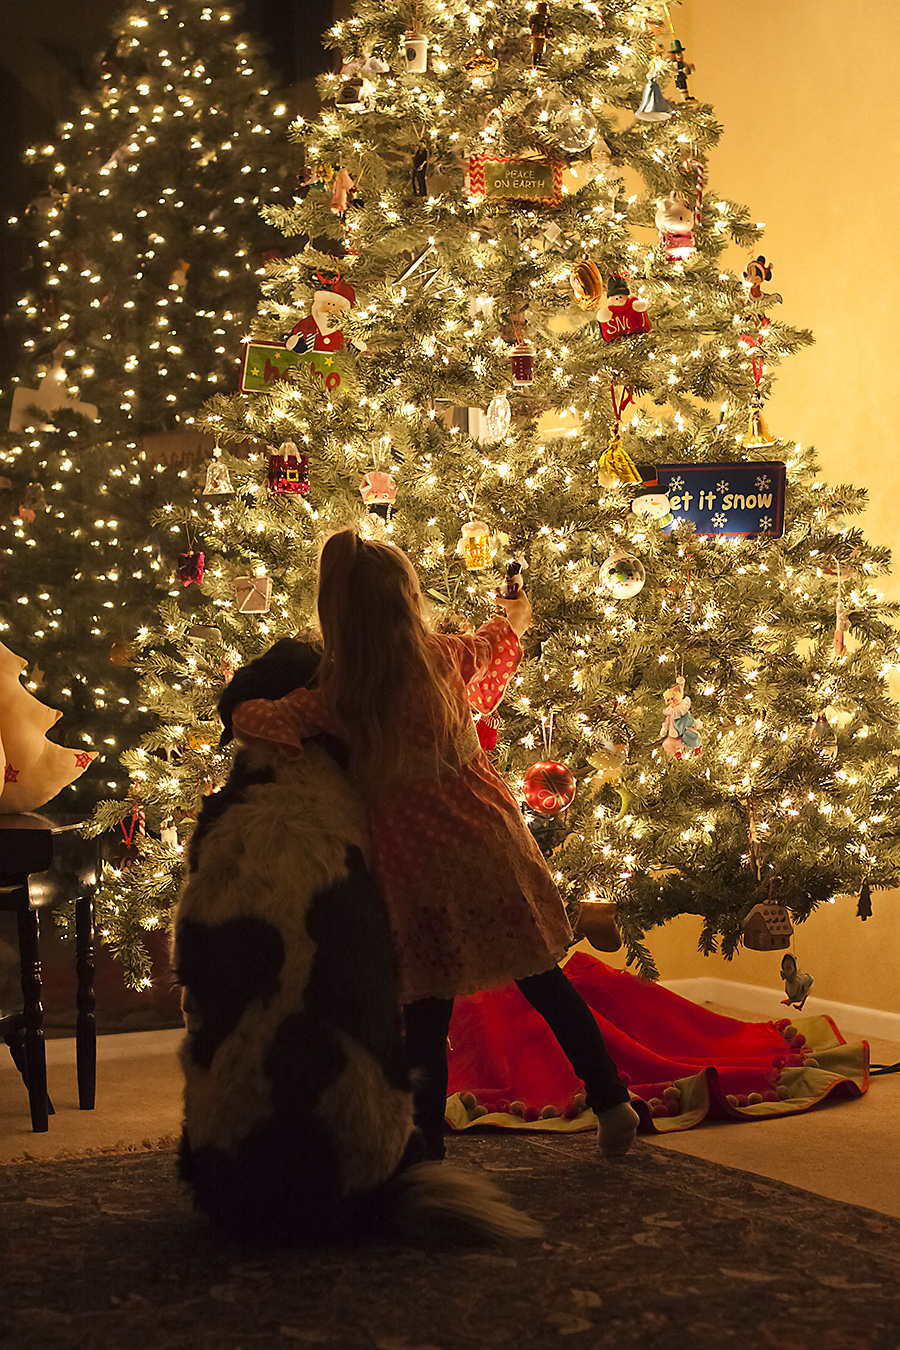
Okay, so this isn't exactly a craft, but perhaps my favorite part of Christmas is the Christmas tree.  I spend hours each season laying on the couch just looking at the twinkling lights and shining ornaments.  And there really is nothing better than curling up with my little dog on the couch and peacefully gazing at the tree.

I try my best to photograph my tree each year, but it's so hard to do!  So I was ecstatic when I found this tutorial by Lil Blue Boo on taking great photos of your Christmas tree.  Since I got a new camera for my birthday this year, I'm excited to try it out.


3. Christmas Stockings via Noodlehead

Two years ago I used Noodlehead's Christmas Stocking tutorial to make these stockings. (You can read the post about the stockings here.) It was my first real sewing project, and I was super proud of how they turned out, despite my sub-par embroidery skills and accidentally using the wrong color bias tape on my own stocking (whoops!).

Since our garage flooded and a bunch of our Christmas decorations got moldy (thank you, tropical storm Debbie!), I decided to make some new stockings this year using the same tutorial.  I'll be sure to share the pictures once they're finished!

4.  Hot Cocoa Mix in a Jar via My Baking Addiction


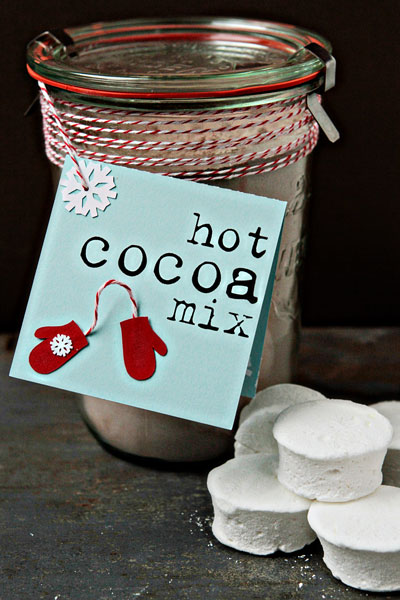
While we decorated our Christmas tree this year, we enjoyed some homemade hot cocoa and popcorn.  It was so yummy, we decided to package it up in a jar, wrap it with a cute label, and give it out as Christmas gifts to co-workers and neighbors.  My Baking Addiction has a great recipe and how-to, but there are lots of variations.  For more variations, consider adding peppermint pieces, caramels, and marshmallows to the mix, or consider adding salt or cayenne pepper in the recipe to bring out the sweetness.

5.  Upside Down Tomato Cage Christmas Tree via New England Design & Construction


This is another good project I found on Pinterest.  Since last year was the first year we actually lived in a house instead of an apartment for Christmas, we're still lacking in the outdoor Christmas light department.  For about $8 I just love this creative idea--turn a tomato cage upside down ($4.78 at Lowe's for a 54") and wrap with plenty of Christmas lights (as low as $2.69 for 100ct at Lowe's), and you've got a DIY outdoor lighted Christmas tree for your yard decorations!  I'll definitely be doing this!

I hope this post gets you inspired for your Christmas craft projects.  Thanks for reading, and as always, happy crafting!

--CC

Monday, September 17, 2012

We Got Engaged!! :)

I haven't really posted all summer.  You may have noticed, unless you've been as busy as I have!  I didn't do much crafting over the summer because I've been busy working hard at my new job, enjoying the summer sunshine, and vacationing in Puerto Rico.

But I have some news to catch you up on!  We got engaged!  He proposed on August 22 during our first vacation together in Puerto Rico.

I love my ring!  He used his mother's stone.
Its also a Verragio and I think it crosses modern and vintage quite well. 
It was all very romantic.  He even had to overcome obstacles to ask me the question.  He planned to ask on the second full day of our stay in Puerto Rico.  Instead, I convinced him we should use that day to travel 2 hours to the Yunque rainforest to go hiking in the mountains and swimming in La Mina Falls, which was very fun but delayed his plans for a day.


So he thought he'd do it the next day, but I woke up a little bit sick (allergic to something in the rainforest--go figure), so I was in a grumpy mood all morning.  Then we found out that tropical storm Isaac was making its way to the island, and since we really wanted to go kayaking in the bioluminescent bays that night and they would be shutting down the tours during the tropical storm, we did that that night instead, and his plans were delayed once more.

This is not the bioluminescent bay--just the ocean.  We don't have any pictures of the glowing waters because I didn't bring my camera for fear I might break during the kayaking part of our journey.


On the fifth day of our trip, he was running out of time and getting a little nervous he might not get to use his plan.  We spent the day in Old San Jaun, then dressed up to go to dinner at La Perla in Condado.  The plan was to take a walk on the beach after dinner, which was where he would ask the question, but instead it started pouring down rain and the tide started coming in while we ate.  Hello, Isaac!


So we took a cab back to our hotel.  When we arrived, there was a break in the rain, and Tyler said, "Let's go out to the beach!"  At first I thought he was crazy, but I agreed.  And I'm lucky I did, because once we were on the beach he got down on one knee and asked me to marry him.


And I said yes. :)


We're so excited and will be sure to share our engagement photos with you as soon as we get them taken.  Thanks for letting us share this happy moment with you!

--CC

Sunday, September 16, 2012

DIY French Board

As you may know, I started a new job at my company a few months back, which involved moving to a different office in the same town.  Now that I'm settled in and (finally) feel like I know at least a little bit what I'm doing, I decided my dull gray cubicle could use some sprucing up, so yesterday evening I made myself a colorful floral french board to hang at my desk.


I looked at a few tutorials before starting my project, but didn't follow any one in particular because the concept is pretty simple.  Basically, it involves cutting out some batting and fabric an inch or two bigger than your canvas, pulling it taught over the edges, then using a regular stapler or staple gun to staple it down.


I made a big X with the first two pieces of ribbon, then eyeballed the rest to layout the grid.  Once I was satisfied with the way it looked, I actually used scotch tape to hold the ribbons in place, then flipped over the French board and stapled down the ribbons.


Last but not least, I sewed on the yellow buttons where the ribbons intersected, and voila!  I have a happy new French board to cheer up my work space.  The whole project took about 2 hours start to finish, and since the canvas had a hole in it, I got it at a 50% damage discount, so the whole project cost about $10.


My grandpa has recently been sending me a lot of vintage photos of my family, so I'm excited to hang some of them on the board.  I can't wait to see what it looks like it my office!


I hope you've been crafting away, possibly on some fall projects...?  The weather has definitely been cooling off here!  (Well, in Florida terms.  So like 88 in the day and 70 at night. Ha!).

Thanks for reading, and happy crafting!
--CC

Tuesday, July 3, 2012

Checking In

Hi folks! Sorry I've been away for so long again. I actually tried to make a post awhile back, but got frustrated when some pictures wouldn't upload. I also started my new job, had company, followed by a tropical storm, and now am away visiting family, so I swear I'm doing the best I can staying in touch! I've had a few projects slowly, slowly, slowing plugging along, so as soon as I have updates for you I'll let you know! I did get a lovely new camera for my birthday so I can't wait to see those pics up on the blog! I'll see you next time! --CC

Sunday, May 13, 2012

Tutorial: Fabric Pocket Denim Shorts

A couple of weeks ago I went out for lunch at a local pizza place and the waitress had on these super-cool denim cut-off shorts with floral fabric in the pockets.  She had obviously bought them made this way, and I thought, "How simple would it be to make those at home?!"  So I whipped up a pair, and now I want to share how I did it with you!


This is another one of those projects that is great for refashioning old kids' jeans.  If you know your child's jeans won't fit them by fall, why not turn them into super-cute shorts to wear this summer?  (In my case I just hadn't worn these jeans in two years because I don't like flare bottoms, so I turned them into shorts!)


So let's get to it!  Follow me after the break for the tutorial!


Sunday, May 6, 2012

Navy Blue Pleated Skirt with Grosgrain Hem

Meet the worst purchase decision I've ever made.


Yes, it's an orange sweater t-shirt.  It went on clearance while I was working at Banana Republic in college.  "It would make a great addition to your work wardrobe," my manager said.  Yes, I thought, I should definitely buy this since I make minimum wage and pay out-of-state tuition and it goes so well with black (Halloween), khaki (zoo worker), and brown (70s...and not the cool retro kind of 70s).

Oh, wait.  It doesn't go with anything.  It's neon-freaking-orange.  Besides, there's no fall or spring in Florida--just summer and February--so you never really get the chance to wear a sweater t-shirt.  So this item has been sitting in my closet with the tag still on for four years.

Until last week when I saw this skirt in Ann Taylor and a light bulb went on.


That's right!  Color blocking is in style and I can now wear neon-orange without looking like I'm going hunting or helping children onto the school bus.  So I whipped up this skirt to wear to work with my worst purchase ever.  (Well, actually it was more like I drug out the project over two weeks than "whipped it up.")


And I love it!  I used Crafty Cupboard's pleated chevron skirt tutorial for the skirt's form, but opted for a solid navy blue linen paired with an orange grosgrain hem instead of a chevron print.  And, oh yeah...


I installed this awesome bright orange zipper. :)


Add some navy blue beads and slingback heals and you've got yourself an outfit.


I just love how awesome the zipper looks.  Like the tutorial said, the details are what make a project great.

The review will (hopefully) be coming soon if you want to know the low-down on do's and don'ts for this project.  Until then, happy crafting!

Thanks for stopping by!

--CC

Tuesday, May 1, 2012

Cinco DIY Projects for Cinco de Mayo

Here are my top five favorite Cinco de Mayo DIY projects.  I know a lot of folks probably are doing these round ups, so I tried to keep mine a little out-of-the-box from what you may have already seen (hopefully).  No margaritas here!  And the winners are...

Numero Uno:


Numero Dos:


Numero Tres:


Numero Cuatro:


Numero Cinco:


Mango Agua Fresca (non-alcoholic) from Whole Foods

Felices fiestas, and thanks for reading!

--CC
Related Posts Plugin for WordPress, Blogger...