Sunday, December 4, 2011

Consider me on blogging vacation...

I'm so sorry for my absence.  Trust me, I really, really, really want to be crafting and blogging.  I really miss cranking out a project and then showing it off here, and I miss the blogging community and all the inspiration it gives me.

Unfortunately, it's taking a lot longer to get the hang of this "working full time" thing.  I thought that since I worked and went to college full-time and still found time for craft projects and blogging that this would be a piece of cake, but it isn't!  Especially since Tyler's in law school now, too.  It's been hard for me to find the time, money and motivation to get up and do a project on Saturdays like I did in college

Instead, I've been doing a little crocheting or reading on weeknight evenings, drooling over Pinterest on my lunch breaks, and sleeping late, spending time with my busy law-student boyfriend and catching up on house work on the weekends.

Now that we live in a house, weekends seem to be consumed by things like leaf-raking...

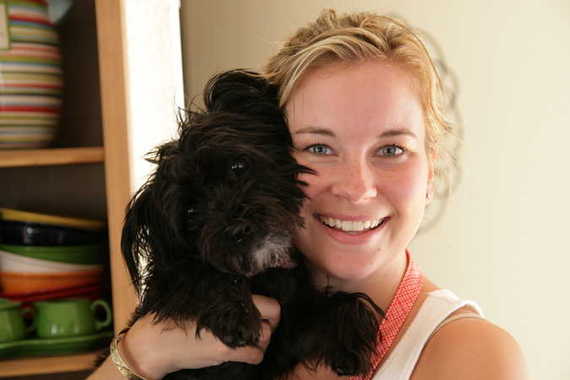
...and raking up puppies.

Sometimes on Sunday afternoons I get the urge to spend some time behind my sewing machine, but the prospect of having to go to Jo-Ann's to get fabric and then photograph it all and write about it here discourages me just as quickly as I was inspired.  And that's not what crafting or this blog is supposed to be about!  This blog is supposed to inspire me, not to deter me!

So for now, I'm going to take a blogging vacation.  Don't worry...I'm sure I'll be in from time to time.  I'm just not going to gaurantee regular content because the thought of having to blog about the crafts I make makes me not want to craft at all.  I need space to craft without the pressure of having to make something more out of it, you know?  I want crafting to be what it originally was for me again...a joy, a break, and a creative outlet.  I'm sure you can understand, right?

So if I have the time, I'll stop by and say hello.  I really do miss you guys, after all!  But if not, I won't make myself feel guilty for my lack of new content.  I hope you understand!  So if you wonder where I've gone, I'm spending time with my family, enjoying the Christmas season, and maybe doing some crafting on the side. ;)

Tyler helping me hang up Christmas lights the day after Thanksgiving.

Our tree and stockings.

Our tree topper.  I have a thing for birds...
 I'll be back more regularly when I feel like I've got this new schedule under control for good.

I hope you're doing well.  Thanks for stopping by, and maybe I'll see you again soon. :)

--CC

Thursday, November 24, 2011

Happy Thanksgiving!

I only caught my kitchen on fire a little bit making our feast today.  I'm thankful it didn't get bigger...and I'm thankful for baking soda. ;)


Here's to hoping you had an excellent holiday!

--CC

Saturday, November 19, 2011

Quick & Easy Holiday Appreciation Project

Hello my lovelies!  I'm sooo sorry I've been absent for so long without warning.  I thought I'd be around more now that I'm getting used to my schedule, but I had a big event at work and then I had to drive up to Missouri for my sister's wedding and then when I got back I got a cold.  Excuses, excuses, I know!  My apologies.

But today I'm here to share with you a little Thanksgiving project.  In the holiday rush, it's really easy to take for granted all the help your significant other gives to you, so I did this for my boyfriend to let him know how much I really do appreciate all the little things he does for me.  It might also make a good idea for an anniversary or Valentine's Day or "just because," too.  It's a really simple way to show someone how much they mean to you and it takes hardly any time at all.  So, are you ready?  Here's what you'll need:
  • Scrapbook paper of your choice
  • Markers
  • Scissors
  • Tape


Step 1:

Make a list of all the reasons why you're thankful for your significant other.  They can be serious things or silly things.  Think outside of the box!  My list ranged from saying thank you for my boyfriend doing the math at the grocery store and eating the dinners I cook even when they turn out awful to putting straws in my drinks and kissing me goodbye in the morning.  Every little thing counts!  In fact, the smaller the reason you're thankful, the better it will probably make your significant other feel!

Once you have all your reasons, write them on your scrapbooking paper with marker and number each one.  Then cut them out with scissors.


Step 2:

Hide the slips of paper all over the house, car, or wherever you think your boyfriend might find them!  Use the tape to attach them where you hide them so they won't get lost and vary how well you hide them.  I left some in pretty much plain sight (like on his desk) so he'd find them right away, and then hid others in one of the back pages of his textbooks I knew he might not find for a good while.  I also hid a bunch of them in spots that made sense with what I was thanking him for.  For example...

"Thanks for putting straws in my drinks." left inside the package of straws.
"Thanks for making me sandwiches." left inside the deli drawer.

"Thanks for making me cookies." inside a bag of chocolate chips.

"Thanks for sending me text messages throughout the day." on his phone charger.
Step 3:


Wait for your thank you notes to be found!  Since they're numbered, your significant other will know that they've found them out of order and there are a bunch more lying around!  It makes them feel appreciated, and it's a lot of fun when they find them!  I hid mine about a month ago now and my boyfriend is still finding some of them occasionally!

And now...THANK YOU for still reading my blog even though I've been MIA.  It really means a lot to have you all as readers and I appreciate your patience with me as I'm adjusting to my new working life!

Happy Thanksgiving if I don't get the chance to stop by again before then!  Thanks for stopping by. :)

--CC

Thursday, November 3, 2011

Cute, Smart Kitchen Towels

 Still not a lot of sewing going on around these parts, but I'm definitely getting antsy to get behind my sewing machine again.  Luckily I'm getting used to my new routine and getting my energy back, so I've got my eye on a few projects.  And the tutorials are certainly piling up on my Pinterest boards!

Here's a set of projects I think I'll conquer soon (links to the original posts are in the captions)...

Fancy Pants Kitchen Towels from Stolen Moments
 Aren't these kitchen towel tutorials beautiful, not to mention brilliant?!  I'm always annoyed at how the kitchen towels fall off the stove, and this totally solves the problem!  Plus, it's totally adorable.  Wouldn't they make nice, simple hostess gifts for Thanksgiving?

Hand Towel Love from The Creamer Chronicles
I have to bake an early-birthday cake and sneak around to get a special early-birthday present for my boyfriend tomorrow (since we'll be in Missouri for my step sister's wedding on his real birthday next weekend!), but hopefully I'll get the chance to get to at least one project this weekend, anyway!

What projects have you been working on?  More than I have, I hope!  I'll let you know how the projects go this weekend. 

Thanks for being so patient with my lack of crafting and regular posts/tutorials lately!  I really do appreciate my readers sticking by me in this life transition of mine.  Thanks also to those of you who helped fill in the gaps by guest posting!  (If anyone else wants to volunteer for that, shoot me an email.  I'd still appreciate the help!)

Until next time, happy crafting!

--CC


Monday, October 31, 2011

Happy Halloween


Just wanted to drop in and wish you all a happy Halloween!  We've decorated our house with jack-o-lanterns, orange twinkle lights and glow-in-the-dark spider webs (sorry, no pics!) and plan on spending the evening in handing out candy (and probably eating as much of it as we hand out!).  Hope you're spending the holiday doing something just as enjoyable!

Sunday, October 30, 2011

Recipe: Toasted Pumpkin Seeds

We carved our pumpkins this afternoon and right now we're toasting pumpkin seeds in the oven!  We did this last year and the pumpkin seeds were so yummy that we decided to make it a tradition.  We're just toasting with salt and butter this year (so healthy, I know), but last year we also tried a spicy caramelized version

There are all sorts of delicious recipes to try with pumpkin seeds, so if you're carving your pumpkins tonight I thought I'd share this basic pumpkin seed toasting recipe so you could test them out!  Feel free to spice to your liking.  You don't have to stick with salt!  (If you're looking for something interesting to try. I suggest brown sugar, cumin, or cinnamon.)  This recipe is just meant to get you started.   Enjoy!

Original recipe source.
Ingredients
  • 1 1/2 cups raw whole pumpkin seeds
  • 2 teaspoons butter, melted
  • 1 pinch salt

Directions

  1. Preheat oven to 300 degrees F (150 degrees C).
  2. Toss seeds in a bowl with the melted butter and salt. Spread the seeds in a single layer on a baking sheet and bake for about 45 minutes or until golden brown; stir occasionally.

Tuesday, October 25, 2011

Puppy Goes to the Pumpkin Patch

 As you know, I've been busy adapting to my first full-time job, so I haven't been doing a lot of crafting, but I hope you've been enjoying the guest posts I lined up for you in the meantime!

I just wanted to pop in on my lunch break today and share a few pictures from my weekend that I snagged off my phone.  They're totally unedited, but I think they're totally cute, anyway!


We got her her own baby pumpkin! Totally ridic, I know.
Thanks for stopping by.  Happy crafting!

--CC

Thursday, October 20, 2011

Kirstikoo Giveaway Winner

You might have noticed I left the Kirstikoo super hero cape giveaway open a little longer to give more people a chance to enter, but since it's getting closer and closer to Halloween I decided to go ahead and choose the winner today.


So, with the help of Random.org, the winner is...


Number four, Mallory!  Keep an eye on your email, Mallory!  Kirsti will be in touch with you soon!  Don't forget that if you didn't win you can still buy a superhero cape pattern in Kristi's etsy shop!

Thanks for playing along, everybody!  Happy crafting!

--CC

Wednesday, October 19, 2011

Guest Post: Pumpkin Pound Cake

Today we're continuing on with our tour of guest posts!  I'm excited to introduce you to Amy of Sing for Your Supper today.  


As you can probably guess from the title, Amy is the author of a fabulous cooking blog!  I stumbled upon her doggie frozen yogurt bites recipe early this year and have been in love with her blog ever since!  My favorite thing about her blog is the organization of the recipes.  She makes it so easy to navigate so you can easily use your favorite recipes again and again!  But that's enough from me.  Amy, take it away! :)


Howdy! It's Amy of Sing For Your Supper and I'm thrilled and honored to be guest posting here at Crafty Critique! I'm an opera singing food enthusiast from Dallas who loves cooking, baking and all things gooey and chocolaty! I'm super lucky to be able to cook for my husband, Joel, who is the world's least picky eater! He always loves everything I make and even gets in on the cooking action sometimes as well! Our Schnauzer/Terrier furbaby and Sing For Your Supper mascot, Izzy keeps us on our toes and puts a constant smile on our faces! My food blog is just a simply gathering of recipes, photos and stories rich in warmth and memories. I love being able to share my recipes with family and friends and hope you'll enjoy! I chose to share my recipe for Pumpkin Pound Cake with you today because it's so perfect for this time of year. The weather is cool and crisp and I absolutely LOVE getting in my kitchen and baking up lots of sweet, pumpkin-y things! The cake is moist, a little dense and full of warm fall spices- plus, it's a real crowd pleaser! The perfect end to a dinner party or with a cup of coffee in the morning. I hope you enjoy this cake as much as we do!


Pumpkin Pound Cake

1 cup granulated sugar
1 cup brown sugar
1 cup canola oil
3 eggs
3 cups all-purpose flour
2 teaspoons baking soda
1 teaspoon ground cinnamon
1 teaspoon ground nutmeg
1/2 teaspoon salt
1/4 teaspoon ground cloves
1 small package instant vanilla pudding mix
1 can (15 ounces) pumpkin puree
Confectioners’ sugar, for dusting

In a large bowl, combine sugar and oil until blended. Add eggs, one at a time, beating well after each addition. In a separate bowl, combine flour, baking soda, cinnamon, nutmeg, salt, cloves and pudding mix; add to egg mixture alternately with pumpkin, beating well after each addition.

Transfer to a greased bundt pan. Bake at 350 degrees for 60-65 minutes or until toothpick inserted near the center comes out clean. Cool for 10 minutes before inverting onto a wire rack. Remove from pan and cool completely. Dust with confectioners’ sugar. Serves 12-16.

Tuesday, October 11, 2011

Guest Post: Halloween Trail Mix


Hello my lovely readers!  Thanks for stopping by!

Today the talented Ashley from Me and My Boys is here to share a spooky snack with you.  But before I let her take it away I just wanted to remind you all to go enter the giveaway for the super hero cape pattern we have going on right now.  
The pattern is customizable and has templates for both boys and girls, making it perfect for Halloween or just for day-to-day dress up.  So go check it out!

And now, without futher ado, here's Ashley!


Hi LADIES! I'm Ashley :) I blog over at Me and My Boys! BUT I am SOOOO excited to guest post here today! I wanted to do something in the HALLOWEEN spirit for ya :) 
I thought to make some HALLOWEEN trail mix.

You will need:
your choice of trail mix
cheese its...or knock off brand (still delicious) 
Halloween candy mix
AND anything else your little heart desires...
then a cute little container to put it all in


I'm all about the cheap brands. I think they taste just as good...and are so much less.


Pour all ingredients into a large bowl and mix it up!


This cute little container I found at our local dollar store and loved it!!!
Pour it in....Easy as that!


Super Duper DELICIOUS! and fun for the Halloween spirit!


If you want to make a cute container you can. I found this tutorial for the jars. This is a little more personal for gifts.


Hope you liked it!!
Come see me at Me and my boys.

Friday, October 7, 2011

Giveaway: Super Hero Cape from Kirstikoo

Today I’d like to introduce you to Kirsti of Kirstikoo Handmade Gifts.   You may remember her from when I reviewed her St. Patrick’s Day Shamrock Garland back in March. 


But if you don't, allow me to introduce you to her!  Kirsti has a lovely blog with lots of neat tutorials and she even has her own Etsy shop.  She's here today so we can get to know her a little better and to do a cool giveaway for her Super Hero Cape patterns, so read on to get the scoop on both!

1. Can you tell us a little bit about yourself? Hi there!! I have been married for 8 years, have a degree in Art Education and now I am a stay at home mom to 2 sweet boys-- 2 and 4 yrs old. They have been my main inspiration in deciding what I want to create next.

2. When did you learn to sew? When I was 12 I took lessons from my aunt. I did sewing projects with her for about a year, but it didn't "click" for me until after I had my first baby. I wanted to create projects for my home and children, and realized there's a whole world of art in sewing- between colors and designs, I'm constantly able to apply that knowledge I graduated with into my everyday crafting.

3. What made you decide to start an Etsy shop? Hehe, this actually started because I became almost obsessed with Etsy. I wanted everything, but couldn't buy anything... It was in seeing the other successful Etsy shops and sellers that motivated me to create my own shop. It's so rewarding to be able to make some extra money and still be home with my kids.


4. What is your favorite product in your shop? My favorite thing to make is the diaperdoo pouch. This was my very first item, and for awhile was my most popular. I loved picking out 2 totally different but coordinating fabrics to create new and fun color combinations. But since then, my shop has sort of evolved into super hero costumes. I think it's because I am not carrying diapers anymore, I am fighting the world with batman and spiderman.

5. What keeps you motivated and inspired? Definitely my children-- when I was raising babies, my most popular and developed items were the burp cloths and diaper pouches. Now that my babies are running around crazy (aka, batman and spiderman) I have been developing those ideas instead. 


6. How do you come up with new ideas? I usually start with a basic project that I have seen somewhere- a magazine, blog, or etsy shop. And then I change it up by adding my own twist- Searching for a fun color scheme or knowledge base using tools I'm familiar with, or supplies that are available to me.

7. How do you balance time between your family and business? It's hard!! I recently hired my aunt (who taught me how to sew) to do most of the sewing so I can run the business, create new products, develop patterns, and still be a stay at home mom. It could be a full-time job for me to manage my store and create the items but I'm not willing to give up my family time. So it's the perfect arrangement right now. I have a whole post on helpful tips for SAHM working an etsy business HERE.

8. What do you think is the most rewarding thing about crafting? Definitely seeing the finished product! I also love to see all the supplies in it's raw form: a scrap of felt, a roll of thread, a yard of satin and some velcro-- step by step turn into a finished product. AWW I love that!

9. What advice would you give to someone new to sewing? Start with the basics. I always hear "All I can do is sew a straight line" and I say, that's all it takes! But it is still important to start with beginning projects- if you are new, avoid projects with zippers, buttons, ruffles, and other added steps that may be overwhelming. There are SO many great beginning sewing tutorials out there! And then work your way up. Practice a lot- make gifts for friends and family while you perfect each project!

10. And finally, in the spirit of the superhero cape giveaway, who is your favorite superhero and why? Hmmm... SuperMOM! Because that is my ultimate goal! I've talked about juggling responsibilities and SuperMom can do them all-- she can cook, launder, keep the children educated, happy & productive, all the while managing a clean home, happy husband, is kind to friends, and don't forget creates a handmade project in there too... But let's face it- Supermom's weakness isn't kryptonite. It's herself. We have to be careful not to think we can do it all. I try to pick 2 or 3 things to focus on a day and remember to be patient with ourselves. So often we forget how special. We all have out own unique talents and abilities.

 So now that you know Kirsti a little better, let's get to what you've all been waiting for...

The Giveaway!!!

Kirsti's newest pattern is her Super Hero Cape Pattern (for boys and girls!), and it’s just in time for Halloween!  The pattern comes with a template and step-by-step photos/instructions for the cape.  You can even buy expansion templates for superhero accessories (everyone needs wrist protection and face disguise!) and templates for your favorite superheros’ logos (including Batman, Wonder Woman, Spiderman and more).  Aren’t these adorable?!  What kid wouldn’t want to dress up in these?!


Don’t have time to sew an outfit before Halloween?  That’s okay, too.  You can buy a Super Hero Cape set premade in Kirstin’s Etsy shop.  Even better news?  Today you’ll have the chance to win one of her Super Hero Cape patterns AND the expansion pack for free!
To enter the giveaway leave a comment and include your email address.  You can write it out like this to avoid spam if you like:  mseaber (at) gmail (dot) com

But I definitely need it to be able to reach you if you win!  For additional entries you may do any or all of the following:
  • Follow Crafty Critique
  • Follow Kirstikoo
  • Like Crafty Critique on Facebook
  • Like Kirstikoo on Facebook
  • Follow Crafty Critique on Twitter
  • Favorite/follow Kirstikoo’s Etsy shop
  • Pin /Tweet about/Write a status update for this giveaway
Leave an additional comment for each entry.  I will use a random number generator to choose a winner one week from today.  Good luck and thanks for reading!

--CC

Tuesday, October 4, 2011

Guest Post: Glazed Pumpkin Pull Apart Bread

 Hello my lovely readers, and welcome if you're joining us from Creative Spaces!  Today I'm excited to introduce you to Genevieve.  She's a talented crafter and she has so many great tutorials on her blog.  For example, you might remember her from when I reviewed her party skirt and pint-sized party skirt tutorials earlier this year.  

 
But if you haven't met her yet, she's here today so you can get better acquainted.  So take it away Genevieve!

Hey there Crafty Critique readers!  How are you?  So I'm Genevieve from Creative Spaces and I'm so excited to be here guest posting today and I can't wait to share this delish fall recipe with ya'll!  I first saw it on Pinterest about a week ago and it just made my mouth water.  Then when my hubby saw the pic, he just asked- so when are you making that?  I thought this past weekend would be perfect as we were getting together with friends and I wanted a yummy but different fall treat.  And let me tell you- it was a hit!  We finished it very quickly.  So let me share with you Glazed Pumpkin Pull Apart Bread.  Ooohhhhh... yum!

The recipe was originally posted here and then I found it here at this blog and made it with only 2 minor adjustments.  Mine looked a little different from hers but I'm not a great cook...  that tells you that even if this recipe seems intimidating to you, try it!  It wasn't as hard as it seemed and turned out great.  Sure to impress anyone!

Now in fairness to the original blogger (I'm all about giving proper credit where due folks!), I'm going to send you to her for the recipe and directions.  She explained it all so well and clearly and explains her adaptations.

But my adjustments- before you go!  When you get to greasing and flouring the pan, I greased and sugared my pan.  To do this, after spraying your pan with Pam, sprinkle sugar over the entire thing.  Then just shake it out over your sink.  Your whole pan should be coated with a thin layer of sugar.  This gave it a nice sugary crispy edge.  See that crispy goodness:


And then after stacking all the bread in the pan, I scooped up all the excess sugar mix and sprinkled it on top.  I loved this extra sugar on top!  I mean if you're going to have a sugary bread, might as well live it up right??  


And then the last thing, next time with my glaze.  (...I used vanilla instead of rum...)  I will thin mine with milk.  It was pretty thick. It was really good but thick so it didn't really spread and run like I was hoping.  Oh well- next time.


Ok well there you have it!  I know that this recipe seems intense- I almost didn't try it.  But do it!  It is delicious, has great presentation, and is different.  I loved that it had a taste of pumpkin but not an overwhelming taste.  I'm not a super pumpkin fan... do I dare say that?  Thanks for walking through the recipe with me and thank you for having me guest post today and stop on by Creative Spaces sometime for my latest crafting adventure!  Have a great day!!

Friday, September 30, 2011

Free Fall Printable


Now, I'm no graphic designer but I saw this quote about fall somewhere recently and decided to try and make it into a printable.  Here's what I came up with:


You can download and print it for free here.  I hope you like it!  It's my first attempt at a printable so go easy on me, okay?  ;)

Anyway, thanks for stopping by today.  Hope to see you again soon!

--CC

Wednesday, September 28, 2011

Ruffle Cuff Pant Legs

Just a quickie to share something great I found today.   If you liked my Knot No-Hem Pants tutorial, I'm sure you're going to love these from A Mother Huddle:

Source
This Ruffle Cuff Pants tutorial shows you a great way to transform pants that are either too short or too long into ones that fit and are completely adorable.  I wish I were younger so I could make some of these for myself! 

Thanks for stopping by!  Happy crafting. :)

--CC

Monday, September 26, 2011

Tutorial: Bow & Whimsy Tank Top

You might remember few weeks ago I showed you my "A Bow and Whimsy Tank Top" in another post


Well, that same week I also shared a tutorial for the blouse over at a blog called Sunny Vanilla.


But just in case you missed it, today I thought I'd share the tutorial here at Crafty Critique.  You can follow me after the jump for the how-to.  Enjoy and let me know if you have any questions! :)


Wednesday, September 21, 2011

Looking for Guest Bloggers

Good news everyone!  I got my first "big girl" job offer this week and I'll be starting my first full-time, post-college job very shortly.  I'm excited for the opportunity, but also a little nervous about how I'll manage my time once I begin.  I'm sure I'll adapt quickly, but I'm not too sure how much free time I'll have on my hands for blogging and crafting over the next couple of months.  So that's where you come in!

I'm sure I'll be able to make time for sewing and blogging eventually, but while I get settled into my new job I thought some of you might like the chance to guest post on my blog!  If you're a crafting blogger, I'd love to have you come post a tutorial.  It can be something new or old.  I don't mind!  Or maybe you have an Etsy shop and would like to host a giveaway to promote your business.  That's fine too, and I'd be really glad to team up with you!

If you're interested in guest posting on Crafty Critique, please send me an email at mseaber (at) gmail (dot) com with subject line "Guest Post."  Please let me know these things in your email:
  1. Link to your blog
  2. Link to the post you'd be sharing, or if it's a new post please send me pictures and/or a description of what you'd like to post about
  3. When you'd be ready to schedule your guest post
I'm not sure what kind of interest to expect from this post and as I've already mentioned I've kind of got a lot on my plate right now, so please be patient with me just in case I get a whole bunch of emails and can't respond to you right away!  ;)  I promise to do my best, though!

As always, thanks for stopping by!  I hope to hear from you soon. :)

--CC 

Monday, September 19, 2011

Jute & Felt Mum Fall Wreath

Hi guys!  Sorry I haven't written since last week.  Life was calling!  I hope that you haven't missed me too much and you've been crafting up a storm without me. ;)

Anyway, I had some time to whip up a new fall wreath today, so I thought I'd drop in and share it with you.


I didn't have time to make a full tutorial, but it's a pretty simple concept so I'll just explain verbally what I did.  I started with a foam wreath (be sure to check out this money saving tip for foam wreaths if you do this project) and wrapped it with some jute I already had on hand.


Next I decorated the wreath with two berry sprigs (99 cents each and 40% off this week at Michael's).  I was able to simply work the wire stems into the foam core of the wreath.  Then I hot glued a whole bunch of felt mums in between the two sprigs.


If you're wondering how I made the felt mums, I did take a few photos of the process.  Here's what I did (please note I didn't have the time to take the best photos to show you how to do this):


As I made the mums I realized the shorter the fringe the better the mums looked, so I gave them little haircuts.  So you might want to adjust your original rectangle to 12"x1".  Anyway, I made about 10 felt mums using that process and hot glued them between the two berry sprigs until I liked the way they looked.


Then, to make the banner, I tied another long piece of jute across the wreath.  I cut diamonds out of colored cardstock scrapbooking paper and folded them in half over the strand of jute and glued them together.  (I sure hope that makes sense!)  I used some scrapbooking alphabet stickers to spell out the word "Fall."


And ta-da!  All finished.  :)  I really like the scrappy look of my new wreath, and the whole project cost me about $3 to make since I already had so much of the supplies on hand.  What do y'all think?


I hope your enjoying some fun fall crafts!  Thanks for reading and see you next time! :)

--CC

This post is linked up here.
Related Posts Plugin for WordPress, Blogger...