Showing posts with label recipes. Show all posts

Sunday, October 30, 2011

Recipe: Toasted Pumpkin Seeds

We carved our pumpkins this afternoon and right now we're toasting pumpkin seeds in the oven!  We did this last year and the pumpkin seeds were so yummy that we decided to make it a tradition.  We're just toasting with salt and butter this year (so healthy, I know), but last year we also tried a spicy caramelized version. 

There are all sorts of delicious recipes to try with pumpkin seeds, so if you're carving your pumpkins tonight I thought I'd share this basic pumpkin seed toasting recipe so you could test them out!  Feel free to spice to your liking.  You don't have to stick with salt!  (If you're looking for something interesting to try. I suggest brown sugar, cumin, or cinnamon.)  This recipe is just meant to get you started.   Enjoy!

Original recipe source.
Ingredients
  • 1 1/2 cups raw whole pumpkin seeds
  • 2 teaspoons butter, melted
  • 1 pinch salt

Directions

  1. Preheat oven to 300 degrees F (150 degrees C).
  2. Toss seeds in a bowl with the melted butter and salt. Spread the seeds in a single layer on a baking sheet and bake for about 45 minutes or until golden brown; stir occasionally.

Wednesday, October 19, 2011

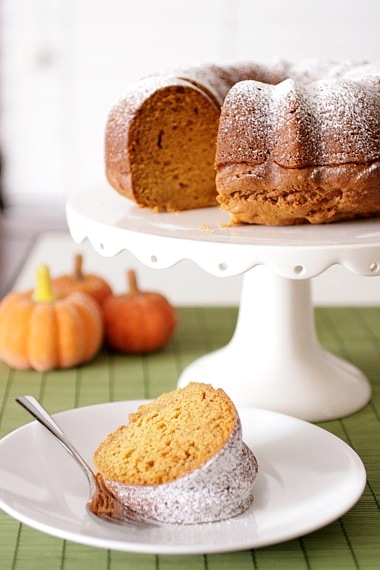
Guest Post: Pumpkin Pound Cake

Today we're continuing on with our tour of guest posts!  I'm excited to introduce you to Amy of Sing for Your Supper today.  


As you can probably guess from the title, Amy is the author of a fabulous cooking blog!  I stumbled upon her doggie frozen yogurt bites recipe early this year and have been in love with her blog ever since!  My favorite thing about her blog is the organization of the recipes.  She makes it so easy to navigate so you can easily use your favorite recipes again and again!  But that's enough from me.  Amy, take it away! :)


Howdy! It's Amy of Sing For Your Supper and I'm thrilled and honored to be guest posting here at Crafty Critique! I'm an opera singing food enthusiast from Dallas who loves cooking, baking and all things gooey and chocolaty! I'm super lucky to be able to cook for my husband, Joel, who is the world's least picky eater! He always loves everything I make and even gets in on the cooking action sometimes as well! Our Schnauzer/Terrier furbaby and Sing For Your Supper mascot, Izzy keeps us on our toes and puts a constant smile on our faces! My food blog is just a simply gathering of recipes, photos and stories rich in warmth and memories. I love being able to share my recipes with family and friends and hope you'll enjoy! I chose to share my recipe for Pumpkin Pound Cake with you today because it's so perfect for this time of year. The weather is cool and crisp and I absolutely LOVE getting in my kitchen and baking up lots of sweet, pumpkin-y things! The cake is moist, a little dense and full of warm fall spices- plus, it's a real crowd pleaser! The perfect end to a dinner party or with a cup of coffee in the morning. I hope you enjoy this cake as much as we do!


Pumpkin Pound Cake

1 cup granulated sugar
1 cup brown sugar
1 cup canola oil
3 eggs
3 cups all-purpose flour
2 teaspoons baking soda
1 teaspoon ground cinnamon
1 teaspoon ground nutmeg
1/2 teaspoon salt
1/4 teaspoon ground cloves
1 small package instant vanilla pudding mix
1 can (15 ounces) pumpkin puree
Confectioners’ sugar, for dusting

In a large bowl, combine sugar and oil until blended. Add eggs, one at a time, beating well after each addition. In a separate bowl, combine flour, baking soda, cinnamon, nutmeg, salt, cloves and pudding mix; add to egg mixture alternately with pumpkin, beating well after each addition.

Transfer to a greased bundt pan. Bake at 350 degrees for 60-65 minutes or until toothpick inserted near the center comes out clean. Cool for 10 minutes before inverting onto a wire rack. Remove from pan and cool completely. Dust with confectioners’ sugar. Serves 12-16.

Tuesday, October 11, 2011

Guest Post: Halloween Trail Mix


Hello my lovely readers!  Thanks for stopping by!

Today the talented Ashley from Me and My Boys is here to share a spooky snack with you.  But before I let her take it away I just wanted to remind you all to go enter the giveaway for the super hero cape pattern we have going on right now.  
The pattern is customizable and has templates for both boys and girls, making it perfect for Halloween or just for day-to-day dress up.  So go check it out!

And now, without futher ado, here's Ashley!


Hi LADIES! I'm Ashley :) I blog over at Me and My Boys! BUT I am SOOOO excited to guest post here today! I wanted to do something in the HALLOWEEN spirit for ya :) 
I thought to make some HALLOWEEN trail mix.

You will need:
your choice of trail mix
cheese its...or knock off brand (still delicious) 
Halloween candy mix
AND anything else your little heart desires...
then a cute little container to put it all in


I'm all about the cheap brands. I think they taste just as good...and are so much less.


Pour all ingredients into a large bowl and mix it up!


This cute little container I found at our local dollar store and loved it!!!
Pour it in....Easy as that!


Super Duper DELICIOUS! and fun for the Halloween spirit!


If you want to make a cute container you can. I found this tutorial for the jars. This is a little more personal for gifts.


Hope you liked it!!
Come see me at Me and my boys.

Monday, August 29, 2011

Recipe: Make Ahead Breakfast Burritos

Today was Tyler's first day of law school!

I made him stand by the mailbox like he was waiting for the bus, even though he wasn't.  Haha.

So to help him get through his first week I made him breakfast burritos using his mom's recipe.  (Thanks for the recipe, Brenda!)  Now, Tyler is a notorious vegetable hater and so I thought I'd share the recipe in case there's anyone in your life who doesn't like all the peppers and onions in their burrito.  (We'll just have to sneak in those veggies somewhere else, huh?)

The recipe is quick and simple, using only one skillet.  Plus, it makes 6 burritos and they refrigerate and reheat well.  No reason not to make them, right?!  So follow me after the break for the recipe!


Thursday, August 18, 2011

Crockpot Hawaiian Chicken

 Day 24!  I'm proud we've made it so far.  Tonight we made another dinner in the Crockpot for our 30 day eating in challenge using this recipe.  We changed it up a little bit and made it with a Hawaiian marinade instead of with a barbecue sauce.


Hawaiian marinade, a can of pineapple chunks, 3 chicken breasts, a Crockpot and 4 hours later we had this:


And it was delicious!  We served it with white rice and broccoli.  The only thing I was a little disappointed about was that the pineapple absorbed so much of the marinade it burned your throat to actually eat it.  I guess it was just to flavor the chicken.  Maybe next time I'll save some extra for us to just eat. :)

Anyway, I hope you've been doing well.  Thanks for reading.  I'll see you tomorrow with my 100th post!

--CC

Tuesday, August 16, 2011

Recipe: No-Fry Parmesan Pork Chops

For Day 22 of 30 Days of Eating In we created a new recipe.  On Sunday I was trying to get together a meal plan for the week and realized we had a whole lot of pork chops we got on sale recently, so I scoured the internet looking for pork chop recipes and found this one on All Recipes.  I tampered with the recipe a little to create a fusion between it and a chicken recipe we've been using for a long time.  This is what I came up with:


No-Fry Parmesan Pork Chops! 

It was pretty yummy if I do say so myself.  Plus, since it's made in the oven, I was able to sweep the whole house and get a few other chores done while it was baking. That's my kind of meal!

To get the recipe, click "read more."

Friday, August 12, 2011

Easy Crockpot BBQ Chicken

For day 18 of our 30 days of eating in challenge we made Crockpot BBQ Chicken.  This recipe was absolutely phenomenal.  Let me list just a few of the things I loved about it for you.
  1. Fix it and forget it!  I put it in at noon and didn't have to bother with it the rest of the day.
  2. No defrosting.  I put the chicken in the crockpot straight-up frozen.
  3. Only 6 ingredients.  And that's including the chicken.
  4. So, so scrumptiously tender! Seriously, this chicken flaked like salmon when you poked it with a fork.
  5. My house smelled like barbecue all day. Um, yes please.
Yet another awful picture.  My apologies.
 We served ours up with cornbread, homemade Parmesan potato wedges (leftover from another night and reheated in the oven while the cornbread baked) and green beans.  A very southern meal, huh?  But it sure was delicious!

Just a few comments about the meal:

We actually used chicken tenderloins instead of chicken breasts because that's what we had on hand.  If you do this, you'll want to reduce the cooking time just a little bit to prevent the meat from drying out.  And if you make yours from frozen chicken like we did, you'll want to add 1 cup of warm water to prevent sudden changes in temperature that could make your Crockpot crack.  Don't worry--the water cooks out.

As far as the recipe itself goes, we didn't care for the vinegar.  It wasn't bad if you like your barbecue sauce kind of tangy.  We just prefer ours a little sweeter.  And, honestly, I think you could probably just put plain ol' barbecue sauce with nothing else and it would still be delicious!

We'll definitely be making this again.  :)

I hope you enjoyed a marvelous dinner with your family.  Thanks for reading!

--CC

Thursday, August 11, 2011

Turkey Pesto Sliders

More 30 Days of Eating In!  We were supposed to try this recipe on Wednesday, but we ended up having to eat a frozen pizza that my boyfriend insisted would fit in the freezer (it didn't) Wednesday night.  So here we are eating our Turkey Pesto Sliders on Thursday.  Consider everything on the menu moved back a day. :)

Ours aren't really so much Turkey Pesto Sliders as they are Turkey Pesto Sandwiches.  And they're not really Turkey Pesto Sandwiches so much as Chicken Pesto Sandwiches.  Hey, we used the supplies we had on hand.

But, anyway, here's how they turned out:

Once again, please excuse the awful picture.  Someday I'll have a nice camera and good lighting.
 Honestly, we didn't really follow the recipe at all.  We used totally different ingredients.

Their ingredients:
  • Slider buns
  • Turkey deli meat
  • Provolone cheese
  • 3 tbsp. pesto 
  • 3 tbsp. mayonnaise
  • 2 tbsp. butter, melted

    Our ingredients:
    • 2 Kaiser rolls
    • Lemon herb chicken deli meat (from Sam's Club.  Awesome deli meat!)
    • Provolone cheese
    • Feta cheese (What can I say?  We like cheese.)
    • A butt-ton of pesto
    See?  Not the same sandwich.  We even cooked ours at a lower temperature (350 instead of 400).  So really we more borrowed the recipe as inspiration for our own toasty dinner sandwiches.

    And they were pretty delicious!  The kaiser rolls were flaky and crispy on the outside but still soft on the inside.  And the feta and provolone cheeses were all hot and melty.  Mmm!  Plus, it was such a quick and easy dinner to throw together.  It took maybe 15 minutes and there wasn't really any cleanup.  We didn't even bother with sides, really.  Just some Baked Lays and fresh carrots. (Betcha can't guess what one of the only vegetables my boyfriend will eat is!)

    It was really the perfect busy-weeknight meal and it feels really good to actually try out a few of those pins from my Pinterest.  They've really been piling up!  Lol.  I'm sure you understand. :)

    How about you?  Have you gotten to try out any of your pinned recipes or tutorials yet?

    --CC

    Monday, August 8, 2011

    Chicken Crescent Rolls

    Yesterday I shared this post about how we're eating in for 30 days so I'm trying out some of the recipes I have pinned on Pinterest.  Today we made the Chicken Crescent Rolls.

    Sorry for the awful photos, but we made dinner after dark and my camera is awful and my kitchen has bad lighting.

    It wasn't a fancy meal, but it sure tasted good and was quick to throw together!  This is an easy weeknight meal whether or not you prepare the filling ahead of time.  And while it's in the oven you have time to do whatever else you need to do!  Pair it with some frozen or fresh veggies and you have a meal.


    The only complaint I had about this meal was that it was too salty.  I'd leave out the salt altogether if I made this recipe again.  And I would also probably make it with the Big Flaky crescent rolls as opposed to the original size because I had leftover chicken filling that didn't fit in the original size.

    All in all, a great meal that even my super picky boyfriend would eat!

    Hope you've been fairing well. :)  Until next time, happy crafting!

    --CC

    Sunday, August 7, 2011

    30 Days of Eating In

    Let me 'fess up to something.  Most A lot of nights my boyfriend and I pick up our dinner at fast food restaurants.  We have a tendency to not plan our meals ahead, which results in me working on a project or homework or whatever until about 9pm, then looking up and saying, "Holy crap I'm starving!"  By then it's too late to try and cook something, so we run to Burger King.  It's either that, or I get home from work/school and I'm too exhausted to make myself anything so we just pick something up.  Gross, right?

    Well, recently we decided enough is enough.  We absolutely need to eat healthier or we'll die very, very young.  So we've challenged ourselves to 30 days of eating in.  We'll cook every day, every meal.  The idea is that by the end of 30 days, we'll have gotten used to cooking at home and made a major lifestyle change.  Hopefully by the end of the month when it's 9pm and I realize I'm starving instead of running to McDonald's I'll think to myself, "Sucks to be me.  I should have thought about this sooner" and make a sandwich.

    We started our 30 day challenge on July 26.  That means we've been eating in now for 14 solid days.  Honestly, I'm surprised we've made it so far.  I thought surely we'd give up.

    It's really taken some planning.  Like, if we go somewhere in the middle of the day I have to make sure we eat before we go or bring a snack because we won't be able to eat again until we get home.  (I've been very strict about this.  I didn't even allow us to buy a soft pretzel during an exceptionally long trip to the mall for an interview outfit.)  We're really getting the hang of it.

    And since we're cooking at home so much and I have about a billion recipes marked on Pinterest, I decided to try a few of them out for dinner this week and share them with you here.  Here's what we'll be making:

    Monday: Chicken Crescent Rolls

    Image/Recipe Source
     We'll be making these with Pillsbury Crescent Rolls (my favorite!) and 2 cups of leftover rotisserie chicken from a few days ago.  Easy, economical and hopefully delicious!

    Wednesday: Turkey Pesto Sliders

    Image/Recipe Source
    Okay, so I know this recipe is like, "Duh."  But we have leftover buns from dinner tonight and I have a job interview on Wednesday, so I thought this would make a quick and easy dinner.  We'll see how it is. :)

    Thursday: Easy Crockpot BBQ Chicken

    Image/Recipe Source
    I'm excited for this because I'm always forgetting to thaw the meat beforehand (another reason we end up with take-out) and according to this recipe you can stick the chicken in the Crockpot still frozen!

    Friday: Chicken with Garlicky Tomato Gravy

    Image/Recipe Source
    This is actually "Romanian Ostropel."  It sounds delicious and can be served over rice, pasta or mashed potatoes.  How versatile!  Plus, we always have leftover potatoes or rice from other meals, so it would really only take one skillet for me to make!

    Tune back in throughout this week to see our meals and get the tutorial review!  Hope to see you again soon!

    --CC

    Tuesday, April 12, 2011

    Homemade Crepes

    Another one of the reasons I hadn't posted in a long time that I didn't mention was that, almost immediately after I returned from California, my friend Raelynne came to Florida to visit me.


    She hadn't visited me before, so I had a lot of fun taking her to see all the local sights.  Raelynne studies foriegn languages (she speaks English, Spanish, German and French!) and spent some time in France recently.  While there, her French friend taught her to make homemade crepes.  I told Raelynne that if she stayed with me, she definitely had to teach me to make crepes!

    First, we bought a crepe pan from William-Sonoma, which is one of my favorite stores! :)  Then we got cooking.  Raelynne mixed up a beer batter crepe recipe that she wrote down while in France.  I don't have the exact recipe now because I didn't make a copy, and it's just as well since they don't make some of the ingredients here in the U.S.  But if you're interested, it's similar to this beer batter crepe recipe from Allrecipes.com.

    Next Raelynne taught me how to cook the crepes!  It's hard, but not as hard as I'd always been led to believe.  You're supposed to pour a very thin layer of batter into your pan and then, using your wrist, rotate the pan so that the batter spreads around into a circle.  All of this should be done within 35-45 seconds!  If you don't have your wrist movement perfected, then your batter doesn't spread all the way into a circle because it's already finished cooking on that side!  Note that you only want a very thin layer in the pan, so the thinner your batter is, the better.  We ended up adding more milk to help thin out our batter.  Since my wrist action wasn't perfected, my crepes were more amoebas than circles.

    Once that side is done cooking, it's time to flip your crepe.  Raelynne taught me to actually flip the crepe in the air, which was the most fun part of this whole process!  First she demonstrated (sorry, I didn't catch any of her flips mid-air):
                                         

    Then I gave it a try.  It took a few attempts, but I finally got it!  (Excuse the jammies...we'd been to the beach that day and I felt like lounging around comfortably!)


    And I was so proud! 


     Monica (my dog) was very interested in the whole process, so I asked her if she wanted to try and flip a crepe, too, but she did not.


    When they were all finished, they looked like this:


    For more, read on after the break. :) 
    Related Posts Plugin for WordPress, Blogger...