Wednesday, August 31, 2011

My First Feature!

Guess what guys?!  I was featured over on craft gossip today!  I'm so excited because it's my first time to be featured anywhere ever!


They are talking about me at CraftGossip.com


I feel so proud.  Haha.  You can go check it out here if you'd like.  :)

Thanks for stopping by!

--CC

EDIT:  And I was featured over here at So Very Creative, too.  It's a lovely blog so you might like to stop by.  :) 


P.S.  Two features in one day?  I can't believe it!  So exciting.

Monday, August 29, 2011

Recipe: Make Ahead Breakfast Burritos

Today was Tyler's first day of law school!

I made him stand by the mailbox like he was waiting for the bus, even though he wasn't.  Haha.

So to help him get through his first week I made him breakfast burritos using his mom's recipe.  (Thanks for the recipe, Brenda!)  Now, Tyler is a notorious vegetable hater and so I thought I'd share the recipe in case there's anyone in your life who doesn't like all the peppers and onions in their burrito.  (We'll just have to sneak in those veggies somewhere else, huh?)

The recipe is quick and simple, using only one skillet.  Plus, it makes 6 burritos and they refrigerate and reheat well.  No reason not to make them, right?!  So follow me after the break for the recipe!


Saturday, August 27, 2011

Knot No-Hem Pants for Adults

Look familiar?


If you were reading back in May, you'll probably remember my knot no-hem capri pants tutorial.


Well, ta-da!  They work for adults, too. And yesterday I whipped up a pair of them for myself!

Sorry about the goon-tarded face!

I had these denim bermudas that were made to look like cutoffs.  I just never wore them because I thought they were an awkward length and kind of boyish.  So I cut off the bottoms and added some pretty fabric using my knot no-hem tutorial.


And you could probably do this with an old pair of jeans or long pants, too.  So many options!

The fabric I used matches a lot of the pink, purple and blue shirts that I have in my closet, plus I think it will look fabulous with this top that I made back in the spring.  ;)

Now you know where the fabric came from.

I never used to wear this pair of bermudas and now it looks like I'll want to wear them all the time because of all the tops they match!  And what's best is that this project cost me nothing because I already had the pants and the fabric on hand from another project.  Wow!  Don't you just love how refashioning an old item can freshen up your wardrobe so easily and cost effectively?

Have you refashioned anything lately?  Share a link if you'd like!  I'd love to see.  :)  Happy crafting and thanks for reading!

--CC

This post is linked up here.

Friday, August 26, 2011

Today at CraftyCritique

Just popping in with a quick sneak peak at a new tutorial I'm working on for y'all.


Anyone wanna make a guess what I'm making?

Thanks for stopping by.  :)  Happy crafting!
--CC

Thursday, August 25, 2011

Refashion: Men's Dress Shirt to Sleeveless Blouse

Ta-da!  I told you I'd be back with this shirt refashion today!  Anyway, I made this top using this tutorial, except, of course, I made it big people size instead of child size.  :) 


Tyler donated a button-up shirt that didn't fit him anymore and I cut it up using a sleeveless blouse of mine as a pattern.  It does pucker a little bit around the bust, so if you try and make this top I suggest cutting it a little larger than needed so you can add darts.

Notice the slight puckering near the arm holes?

Anyway, I kept the same bottom hem as the original shirt, so all I had to do was sew together the sides and the shoulders/neck, plus add bias tape (which I made myself for the first time!) around the arm holes.


I did everything pretty much the same as the tutorial, except that since my shirt was adult sized I didn't have enough fabric leftover for the neck tie.  Sooo...I just happened to have this teal and navy satin fabric that I scooped up at Jo-Ann's for $2 a yard way back when and it matched fabulously.


I think I like the top with the satin tie around the neck better than I would have liked it if the whole shirt were just the navy blue fabric.  I think it gives it the shirt a little surprise factor and femininity.


This top was so easy to make it was ridiculous, and now I have something new I can wear for work that cost me less than $2.  Hooray!

Thanks for reading and happy crafting to ya!

--CC

This post is linked up here.

Dontcha hate it when you run out of time?

I know yesterday on Facebook I promised a refashioning post for y'all today, and I really did do the project!  Unfortunately, I wasn't finished around 7:30 and had to make a choice between walking the dog and taking pictures for the post since the sun's been going down earlier and earlier these days.   Hey, I'm not complaining if it means fall weather will get here soon.  I'm so tired of this 100 plus degree weather! 

Of course, Poppy (as we call Monica sometimes) came first. So we went on a romp around the neighborhood....


And rolled in our favorite stinky spot.


And before we knew it the sun was down and it was too late for me to take any pictures for you! :(

But don't worry!  I'll be back tomorrow with a post for you.  Plus, I have a few more awesome plans just waiting to be executed over the next couple weeks.  I'm so excited I can hardly wait!

See you tomorrow!

--CC

Sunday, August 21, 2011

Tutorial Review: Ruffle Tote

I've been reading a new blog the past couple of days called Mommy by day...Crafter by Night, which is where I found this tutorial for a ruffle pocket tote.  So last night I went over to a friend from my (new) crafting circle's house and sewed a ruffle pocket tote for myself!


I really like the way it turned out, although the ruffle and the pocket were too thick for me to be able to put my presser foot down without it getting jammed, so the top of my ruffle is a little bit wonky.  See?


I've never been that great at sewing down ruffles.  Tips, anyone?  Anyway, hopefully no one will notice the drunken sailor stitch, as I like to call it!


The inside of the bag, the straps and the ruffle are all made from a striped fabric.  I love the way the two look together even though I got really frustrated trying to find a fabric that matched this floral print while I was in Jo-Ann's.

So now I'm going review the tutorial!  I know, right?!  It's been a long time since I've done one of these.  You can follow me after the break to get the review!

Saturday, August 20, 2011

Tutorial: Sleeveless Bow Top

A lot of people are afraid to try and make clothing or draft their own patterns.  At least, I know I was when I first started sewing!  But a few tutorials of easy projects (like this one or this one) helped me find my bearings and I’m proud to say that I finally feel confident venturing out and making some of my own patterns.  And today I want to help you see that you can draft your own pattern and sew your own clothes, too!  Sooo….


Introducing the Sleeveless Bow Top Tutorial!  It's my first "big girl" tutorial, so bear with me (and email me if it doesn't make any sense!).

I modeled the Sleeveless Bow Top after this top I saw for sale online recently.   It’s a cute, comfortable top to finish out the summer with, and might even be great under a cardigan for the fall.  And the good news is it's made a lot like a pillowcase top so it’s just about one of the easiest garments you can sew!  I know you can do it, so follow me after the break to get started.


Friday, August 19, 2011

Roundup: DIY Party Decor & 100th Post

Hello and welcome to my 100th post!


Before we get started with the DIY Party Decoration roundup, I just want to say THANK YOU to all of my readers out there.  There might not be many of you, but it makes me feel wonderful and proud to have my own little space, however small, in the crafting blogosphere.  It's cheesey, but I couldn't have done it without you.  (Really!)  My hope is that by reading about my crafting successes and failures here you feel inspired to try it yourself.  So here's to the next 100 posts!

And now, to celebrate, bring on the DIY Party ideas!  So, put on your party hats...

DIY Party Hats by Oh Happy Day
 And follow me after the jump for a whole lotta party decoration ideas! :)

Thursday, August 18, 2011

Crockpot Hawaiian Chicken

 Day 24!  I'm proud we've made it so far.  Tonight we made another dinner in the Crockpot for our 30 day eating in challenge using this recipe.  We changed it up a little bit and made it with a Hawaiian marinade instead of with a barbecue sauce.


Hawaiian marinade, a can of pineapple chunks, 3 chicken breasts, a Crockpot and 4 hours later we had this:


And it was delicious!  We served it with white rice and broccoli.  The only thing I was a little disappointed about was that the pineapple absorbed so much of the marinade it burned your throat to actually eat it.  I guess it was just to flavor the chicken.  Maybe next time I'll save some extra for us to just eat. :)

Anyway, I hope you've been doing well.  Thanks for reading.  I'll see you tomorrow with my 100th post!

--CC

Tuesday, August 16, 2011

Recipe: No-Fry Parmesan Pork Chops

For Day 22 of 30 Days of Eating In we created a new recipe.  On Sunday I was trying to get together a meal plan for the week and realized we had a whole lot of pork chops we got on sale recently, so I scoured the internet looking for pork chop recipes and found this one on All Recipes.  I tampered with the recipe a little to create a fusion between it and a chicken recipe we've been using for a long time.  This is what I came up with:


No-Fry Parmesan Pork Chops! 

It was pretty yummy if I do say so myself.  Plus, since it's made in the oven, I was able to sweep the whole house and get a few other chores done while it was baking. That's my kind of meal!

To get the recipe, click "read more."

Sunday, August 14, 2011

Steel Lantern Surprise Package

I went out to check the mail a couple days ago and this was at my door:


My oh-so-sweet mom sent me 4 steel lanterns!  (Okay, so maybe they're not steel but the look like steel).  I was so surprised and excited so immediately put them out on my screened in patio.


They really match the 1960s Battleship Gray concrete floors and juxtaposed against the wooden lattice they give the patio a really modern feel.


At the bottom of the box my mom also put some Citronella tea lights for the lanterns (and all the dadgum buggies here in Florida!), plus a couple home magazines.  One of them was a landscaping magazine to help me with my backyard projects.

I realized this picture was blurry after I uploaded it and was too lazy to re-take.  Sorry!
 She even bookmarked the pages she thought I'd like.  Aww.  I <3 my mom!


Here's to hoping your day is full of surprises!  Happy crafting and thanks for reading. :)

--CC

Saturday, August 13, 2011

Romanian Ostropel

Tonight we tried out another new recipe for our 30 Days of Eating In challenge: Ostropel.  Ostropel is a Romanian dish, but an Americanized name for it is Chicken with Garlicky Tomato Gravy.


I found the recipe on Pinterest and thought it sounded tasty, plus it's all made in one skillet and can be served over rice, pasta or mashed potatoes.  We almost always have one of those staple sides leftover in our fridge, so I thought this might be another quick-and-easy weeknight meal.

I was wrong.  Maybe it was just me, but even though I read the recipe twice before making this dish, the directions were still hard to follow.  The steps seemed to be broken up oddly and I couldn't navigate through them quickly enough.  I kept having to take the whole skillet off the stove to avoid burning while I read what to do next.  Don't get me wrong--it wasn't that hard to make, it was just hard to read the recipe.

I also have gripes with the sauce.  It required me to buy ingredients that I don't normally have on hand (like chicken stock, tomato paste and chimbru) and it wasn't worth it.  I was expecting the sauce to be bold and flavorful with ingredients like tomato and garlic, but it tasted very bland.  And mixed with the chicken stock I felt like I was eating a watered down chicken/tomato soup over breaded chicken.

I guess there wasn't really anything gross about the dish.  It tasted fine and was really filling.  It was just very bland.  Honestly, after we finished eating we were full but still wanted to eat something just because we felt like we didn't get to taste much.  Usually we try things twice before calling it quits, but I don't think we'll be making this recipe again.

It wasn't all bad, though.  The chicken and the rice were good, albeit plain.  We're thinking of putting the chicken in a spicy orange sauce we've made before. (Coincidentally, we didn't like the meat that time, but the sauce was great).  We'd still serve it over the rice to make an Asiany dish.  We'll let you know how that goes and hopefully share the recipe. :)

I'm still glad we branched out and tried something new, though. 

Hope your dinner was more of a success than ours.  Happy crafting!

--CC

Pleated Slide-On Dog Collar Accessory

I saw this tutorial yesterday on Pleat Week at See Kate Sew and I just knew it would make a great project for another slide-on dog collar accessory or embellishment (whatever you want to call it).
The idea is to sew pleats onto one rectangle of fabric, then sew another piece of fabric to the back so it could slide onto a headband.
I think this could easily be converted into a project for your dog's collar.  Make the pleated fabric the exact same way, except slide it over the dog collar instead of over a headband and viola!  You have another cute accessory for your pooch.

Hope you've been crafting up a storm!

--CC

Friday, August 12, 2011

Easy Crockpot BBQ Chicken

For day 18 of our 30 days of eating in challenge we made Crockpot BBQ Chicken.  This recipe was absolutely phenomenal.  Let me list just a few of the things I loved about it for you.
  1. Fix it and forget it!  I put it in at noon and didn't have to bother with it the rest of the day.
  2. No defrosting.  I put the chicken in the crockpot straight-up frozen.
  3. Only 6 ingredients.  And that's including the chicken.
  4. So, so scrumptiously tender! Seriously, this chicken flaked like salmon when you poked it with a fork.
  5. My house smelled like barbecue all day. Um, yes please.
Yet another awful picture.  My apologies.
 We served ours up with cornbread, homemade Parmesan potato wedges (leftover from another night and reheated in the oven while the cornbread baked) and green beans.  A very southern meal, huh?  But it sure was delicious!

Just a few comments about the meal:

We actually used chicken tenderloins instead of chicken breasts because that's what we had on hand.  If you do this, you'll want to reduce the cooking time just a little bit to prevent the meat from drying out.  And if you make yours from frozen chicken like we did, you'll want to add 1 cup of warm water to prevent sudden changes in temperature that could make your Crockpot crack.  Don't worry--the water cooks out.

As far as the recipe itself goes, we didn't care for the vinegar.  It wasn't bad if you like your barbecue sauce kind of tangy.  We just prefer ours a little sweeter.  And, honestly, I think you could probably just put plain ol' barbecue sauce with nothing else and it would still be delicious!

We'll definitely be making this again.  :)

I hope you enjoyed a marvelous dinner with your family.  Thanks for reading!

--CC

Tutorial: Felt Butterfly Dog Collar Embellishment

Two tutorials in one week!  I must be on a roll. ;)  Anyway, I got the idea for this felt butterfly dog collar embellishment when I was making the tutorial for the ruffle dog collar embellishment


It's another really simple one and it's pretty fun to decorate your own butterfly.  So, without further ado, here's the butterfly tutorial!

Thursday, August 11, 2011

Turkey Pesto Sliders

More 30 Days of Eating In!  We were supposed to try this recipe on Wednesday, but we ended up having to eat a frozen pizza that my boyfriend insisted would fit in the freezer (it didn't) Wednesday night.  So here we are eating our Turkey Pesto Sliders on Thursday.  Consider everything on the menu moved back a day. :)

Ours aren't really so much Turkey Pesto Sliders as they are Turkey Pesto Sandwiches.  And they're not really Turkey Pesto Sandwiches so much as Chicken Pesto Sandwiches.  Hey, we used the supplies we had on hand.

But, anyway, here's how they turned out:

Once again, please excuse the awful picture.  Someday I'll have a nice camera and good lighting.
 Honestly, we didn't really follow the recipe at all.  We used totally different ingredients.

Their ingredients:
  • Slider buns
  • Turkey deli meat
  • Provolone cheese
  • 3 tbsp. pesto 
  • 3 tbsp. mayonnaise
  • 2 tbsp. butter, melted

    Our ingredients:
    • 2 Kaiser rolls
    • Lemon herb chicken deli meat (from Sam's Club.  Awesome deli meat!)
    • Provolone cheese
    • Feta cheese (What can I say?  We like cheese.)
    • A butt-ton of pesto
    See?  Not the same sandwich.  We even cooked ours at a lower temperature (350 instead of 400).  So really we more borrowed the recipe as inspiration for our own toasty dinner sandwiches.

    And they were pretty delicious!  The kaiser rolls were flaky and crispy on the outside but still soft on the inside.  And the feta and provolone cheeses were all hot and melty.  Mmm!  Plus, it was such a quick and easy dinner to throw together.  It took maybe 15 minutes and there wasn't really any cleanup.  We didn't even bother with sides, really.  Just some Baked Lays and fresh carrots. (Betcha can't guess what one of the only vegetables my boyfriend will eat is!)

    It was really the perfect busy-weeknight meal and it feels really good to actually try out a few of those pins from my Pinterest.  They've really been piling up!  Lol.  I'm sure you understand. :)

    How about you?  Have you gotten to try out any of your pinned recipes or tutorials yet?

    --CC

    Wednesday, August 10, 2011

    Tutorial: Ruff-Ruffle Dog Collar Embellishment

    I was getting bored with felt flowers and bandanas for my dog's collar, so I dreamed up this slide-over-the-collar ruffle embellishment.


     And guess what?  Today you get to learn how to make one, too!  It's really easy and super cute, so click "read more" to get the tutorial. :)

    Monday, August 8, 2011

    Chicken Crescent Rolls

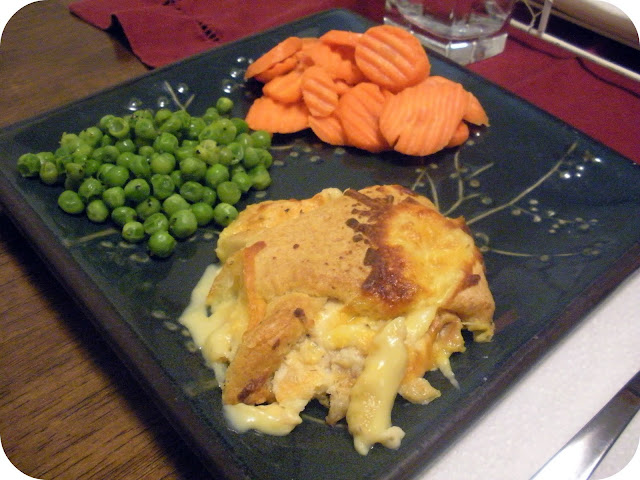
    Yesterday I shared this post about how we're eating in for 30 days so I'm trying out some of the recipes I have pinned on Pinterest.  Today we made the Chicken Crescent Rolls.

    Sorry for the awful photos, but we made dinner after dark and my camera is awful and my kitchen has bad lighting.

    It wasn't a fancy meal, but it sure tasted good and was quick to throw together!  This is an easy weeknight meal whether or not you prepare the filling ahead of time.  And while it's in the oven you have time to do whatever else you need to do!  Pair it with some frozen or fresh veggies and you have a meal.


    The only complaint I had about this meal was that it was too salty.  I'd leave out the salt altogether if I made this recipe again.  And I would also probably make it with the Big Flaky crescent rolls as opposed to the original size because I had leftover chicken filling that didn't fit in the original size.

    All in all, a great meal that even my super picky boyfriend would eat!

    Hope you've been fairing well. :)  Until next time, happy crafting!

    --CC

    Sunday, August 7, 2011

    30 Days of Eating In

    Let me 'fess up to something.  Most A lot of nights my boyfriend and I pick up our dinner at fast food restaurants.  We have a tendency to not plan our meals ahead, which results in me working on a project or homework or whatever until about 9pm, then looking up and saying, "Holy crap I'm starving!"  By then it's too late to try and cook something, so we run to Burger King.  It's either that, or I get home from work/school and I'm too exhausted to make myself anything so we just pick something up.  Gross, right?

    Well, recently we decided enough is enough.  We absolutely need to eat healthier or we'll die very, very young.  So we've challenged ourselves to 30 days of eating in.  We'll cook every day, every meal.  The idea is that by the end of 30 days, we'll have gotten used to cooking at home and made a major lifestyle change.  Hopefully by the end of the month when it's 9pm and I realize I'm starving instead of running to McDonald's I'll think to myself, "Sucks to be me.  I should have thought about this sooner" and make a sandwich.

    We started our 30 day challenge on July 26.  That means we've been eating in now for 14 solid days.  Honestly, I'm surprised we've made it so far.  I thought surely we'd give up.

    It's really taken some planning.  Like, if we go somewhere in the middle of the day I have to make sure we eat before we go or bring a snack because we won't be able to eat again until we get home.  (I've been very strict about this.  I didn't even allow us to buy a soft pretzel during an exceptionally long trip to the mall for an interview outfit.)  We're really getting the hang of it.

    And since we're cooking at home so much and I have about a billion recipes marked on Pinterest, I decided to try a few of them out for dinner this week and share them with you here.  Here's what we'll be making:

    Monday: Chicken Crescent Rolls

    Image/Recipe Source
     We'll be making these with Pillsbury Crescent Rolls (my favorite!) and 2 cups of leftover rotisserie chicken from a few days ago.  Easy, economical and hopefully delicious!

    Wednesday: Turkey Pesto Sliders

    Image/Recipe Source
    Okay, so I know this recipe is like, "Duh."  But we have leftover buns from dinner tonight and I have a job interview on Wednesday, so I thought this would make a quick and easy dinner.  We'll see how it is. :)

    Thursday: Easy Crockpot BBQ Chicken

    Image/Recipe Source
    I'm excited for this because I'm always forgetting to thaw the meat beforehand (another reason we end up with take-out) and according to this recipe you can stick the chicken in the Crockpot still frozen!

    Friday: Chicken with Garlicky Tomato Gravy

    Image/Recipe Source
    This is actually "Romanian Ostropel."  It sounds delicious and can be served over rice, pasta or mashed potatoes.  How versatile!  Plus, we always have leftover potatoes or rice from other meals, so it would really only take one skillet for me to make!

    Tune back in throughout this week to see our meals and get the tutorial review!  Hope to see you again soon!

    --CC

    Saturday, August 6, 2011

    Antiquing in Missouri

    One day while we were in Missouri I went antiquing with my mom.  Normally I find antiquing boring, but I was surprised what I good time I had this time!  We found sooo many neat things!  (See?  I used multiple O's, implying that there were a lot a lot of neat things.)  Here are just a few things I thought you all, as crafters, might also find neato burrito:

    Antique sewing bust.

    Antique tailor's measuring tape.

    This was the most awesome thing ever to hold thread...

    ...except it was $400.
     Click "read more" for the rest of this super long post full of pics! :)
    Related Posts Plugin for WordPress, Blogger...